FAQs on PFMS-Employee Information System
Email : pfms-eis@gov.in
Search...FAQs
Ans. Employees Information System (EIS) is a Centralized, Integrated (with PFMS) Web based System/ Package for Personnel Information and Payroll. It provides comprehensive structural facilities for Drawing and Disbursing Offices working for different Departments/Ministries of the Government of India.
It works on the concept of dual user i.e. "DDO Maker" & "DDO Checker" and both registered under the domain of Drawing & Disbursing Officer. The DDO Maker work is to input the details and prepare the all types of bills and DDO Checker work is to verify and submit to PAO for further processing of Bill payment.
Ans. At present Employee Information System is only available for the Drawing & Disbursing offices of Civil Departments/ Ministry of the Government of India.
Ans.The pre-requisite for implementation of EIS are as under:
- The office DDO is working for the Civil Department/Ministry of the Government of India.
- Have six digit DDO Code allotted by Controller General of Accounts, Department of Expenditure, Ministry of Finance, Government of India under its accounting organization.
- The PAO of the DDOs is on-board on PFMS.
- The DDO is registered for working on PFMS.
Ans.The following steps required to be completed before rollout of EIS:
- Creation and approval of DDO Maker & DDO Checker in PFMS.
- Obtained the authorization for working on EIS through email from ITD, O/o CGA.
For authorization on working/accessing PFMS-EIS portal, DDO has to send a request to IT Division through email to pfms-eis@gov.in mentioning therein Controller Code, PAO Code and DDO Code.
Ans.The following steps required to be completed before closing the DDO in EIS:
- Complete the Post paid updation and Post to PBR of all the bills or delete the pending processed bills, if any.
- Capture the Transfer details of the employee with option of posting as DDO not known or if DDO details is available select the particular DDO code.
- Generate LPC of all the employees.
Ans. The Employee Information System is works on concept of dual user.
DDO Maker- All the officials (dealing hand) working for the preparation of Salary Bills can be designated/registered separately as DDO Maker in EIS. All the Data Entry work are required to be done by them.
DDO Checker- The DDO(Admn) itself may be registered as DDO Checker for working in the EIS. He/she verify and authenticate after scrutiny of all the work done by DDO Maker. The submission of bills to PAO is routed through DDO Checker.
However, this is in the jurisdiction of concerned DDO to make the users accordingly.
Ans. Registration Form for User creation is available on the PFMS portal i.e. https://pfms.nic.in at Login page "New User Registration Form".
a) Creation and Approval of DDO Checker: The User is required to fill this form and submit to DDO. DDO will create User Online through the option User→User Ministry Registration after login in PFMS. After creation of user id, a link for authentication is sent to email of DDO Checker for verification. After authentication by User, the DDO will then approve the User through the option User→Ministry User list and send physical registration form with supporting documents to PAO Office for approval as 2nd level authority . After approval by PAO, user id and password details are sent to user's mail id and user can login in sytem after 24 hours.
b) Creation and Approval of DDO Maker: The User is required to fill this form and submit to DDO. DDO will create User Online through the option User→User Ministry Registration after login in PFMS. After creation of user id, a link for authentication is sent to email of DDO Maker for verification. After authentication by User, the DDO will then approve the User through the option User→Ministry User list and send physical registration form with supporting documents to PAO Office for approval as 2nd level authority . After approval by PAO, user id and password details are sent to user's mail id and user can login in sytem after 24 hours.
Ans.This consist of two steps as under:
a) To know the login ID of DDO Maker and DDO Checker: The PFMS User which created the DDO Maker or DDO Checker and only can retrieve the created Login ID. For this he/she has to login in PFMS and have to use the optionUsers→Manage
. In the Status type option select Approved
and click search. All the users with approved status will be displayed. Note the login ID verifying the details mentioned with it.
b) To retrieve the password: The DDO Maker/Checker is required to Go to link Forgot Password?
provided on the home page/login page of PFMS (https://pfms.nic.in). Follow the instruction therein. After successful validation of all details you get the option to Reset Password. This provision is applicable to all types of Users of PFMS.
Ans. The DDO is required to take the following two actions:
a) Disable the login ID of transferred official using the option User→Manage
. Search the login ID of the DDO Maker and click on the hyperlink associated with login ID. Now selected the Disable option.
b) The registration procedure for DDO Maker is mentioned n the Q.No. B.2 (b) above.
Ans. The new DDO joined in the office should take the following action:
a) First he/she has to register him/her as DDO PFMS User. For this he/she required to fill the New Registration User Form and submit it to PAO Office with supporting documents. The PAO will create the login ID for DDO after verification of details submitted. With creatioon, a authentication link will be sent to User Email. After authentication by User in email, PAO Office will approved the User details online and submit the physical Form with supporting documents to Pr.A.O. for approval as Final Authority. After approval by Pr.A.O, User can login in PFMS system after 24 Housrs.
Further for registering him/her as DDO Checker it is require to follow the registration process mentioned at Q B 2(a) above.
b) He/she should also send request to disable the login ID of transferred official to PAO Office.
Ans. a) The Users have been registered by the DDO/DDO Checker. Approval may pending by the PAO/DDO Checker. Follow the steps given at Q.No. B.2(a) and (b) above.
b) The Users have been registered and approved by the DDO. Authorization for working on EIS is still pending. Please submit a request to IT Division through email at pfms-eis@gov.in mentioning therein Controller Code, PAO Code and DDO Code for authorization.
Ans. The following steps are mandatorily taken at first in the sequence given below:
- Saving of DDO Profile − Main Office details. This action can be performed by login in PFMS by DDO Maker user and saving the details of Main Office using the option: Establishment→DDO Profile→Main Office
- Mapping of Designation − This can be done with the login with DDO Checker user ID using the option Establishment→Utility→Map Designation
- Creation of Custodians for Departmental/Other Pool Quarters: The access right for creation of Custodians is lying with PAO Offices in EIS. The DDO office may contact PAO Office for creation of Custodians by providing details of Name of the Quarter Pool and related Scheme Code (Functional Head).
- Creation of GPF Series: This has following scenarios:
- GPF is being maintained by PAO Office: In this case, DDO can simply request the PAO Office for creation of GPF Series for working in EIS.
- GPF is being maintained by DDO Office itself (Merged DDO case): In this case, DDO can itself create the GPF Series by login in PFMS-EIS through DDO Checker and using the option Establishment→Utility→ PF series for Merge DDO/Others.
- GPF series of Deputation Employees: DDO Checker can create PF series for officials for whom GPF maintained by State AG as well as Other PF Agency using the option given under Utility→ PF Series for GPF (State/Other).
The details of Sub-ordinate Office can also be saved one by one if required through the option Establishment→DDO Profile→Sub-ordinate Office
Ans. The Sub-Ordinate Offices are the field offices located at different places than Main DDO, Pay Bills are being prepared and separate PBRs are being maintained in respect of these offices by the Main DDO. In general, Sub-Ordinate Offices has different City Class than Main Office.
If the number of Employees in the Sub-Ordinate Offices are very less and no separate PBR is maintained, then it is suggested that no Sub-ordinate Office may be saved. However, it is in the jurisdiction of DDO whether to maintain or not to maintain Sub-Ordinate Offices.
Ans. No, if a DDO Maker user saved the details of DDO Profile-Main Office once, it is available to all DDO Maker Users. In case of any updation in the details of Main Office in future, any DDO Maker user can update the same.
Ans. The access to Mapping of Designation is available to DDO Checker only. The option is available at “Establishment→Utility→Map Designations”. In this form, the grid shows the list of Designation already mapped to this DDO or already mapped by any DDO of Ministry/Dept.
For mapping new Designation, please follow the steps given below:
- In the Designation Details, select Group and then click on an Alphabet ( A...Z ) with which designation starts.
- If for the above combination i.e. Group and Alphabet (A ... Z), Designation is/are available the Alphabet will be slightly enlarged and highlighted with RED colour.
- From the Combo “Select Designation”, select the desired Designation. On selection, System generated Designation Code and Superannuation Age will be shown. Click the Save button to map this Designation. The System will populate the message “Designation Details Saved Successfully.”
Ans. If the Designation is not available as per above exercise Q. No. C.4(c), first check whether this Designation is available in the above grid or not. If not, then provide the following information to ITD, O/o CGA through email at pfms-eis@gov.in mentioning subject as “Addition of Designation”:
- Name of Designation in Full (avoid abbreviations)
- Group related to Designation [A, B (Gazetted), B (Non-Gazetted), C OR D]
- Superannuation Age [associated with Designation (Post), not of the Employee]
Ans. Yes, this option can be exercised by DDO Checker only. There is a link “Set Designation Hierarchy” at “Establishment →Utility →Map Designations” option at right side bottom of the page.
As mentioned above, the details of designations already mapped can be known.
Yes, go to the link “Establishment →Utility→ Map Designations” and click on the Print option at right side bottom of the page. (*This is not operational at present-only for report)
Ans. Yes, if a DDO has mapped any Designation from Common Designation Master of EIS Administration, it will be available to all the DDOs of the Ministry/Department as all the DDO's are governed by same Controller Code.
Ans. Creation of GPF Master Series (PF Series):
- By PAO Office (for Non-merged DDO: For DDO's for whom PAO Office maintained all GPF details of employee) The PAO may login with its PFMS credential login at https://pfms.nic.in and select the option: “Employee Information System→Reference Data→GPF Series”. In the form provided fill the PF Series viz. PAO/WR/ABC. The slash (/) at last may be avoided. The System will automatically add last slash while filling the details of “Numeric” part of GPF Number in the Initial Employee Details by DDO Maker.
- By DDO Office (for Merged DDO): If GPF is being maintained by DDO Office, DDO can itself create the GPF Series by login in PFMS-EIS through DDO Checker and using the option Establishment→Utility→ PF series for Merge DDO.
Ans. The access right for creation of Custodians is lying with PAO Offices in EIS. The DDO office provide the details of “Name of the Quarter Pool Type” and related Scheme Code (Functional Head) to the PAO Office and with login in PFMS-EIS, PAO can create the Custodian Series using the option “Employee Information System→Reference Data→Custodian Master”.
Ans. No. In case of Directorate of Estate Office Quarters, there is inbuilt Custodian Series “Directorate of Estate” mapped with Scheme Code (Major Head “0216”) in the system by default.
Ans. The option for creating GPF Merge Series is given at DDO Checker level “Establishment→ Utility→PF Series for Merge DDO
Ans. With rollout of EIS in DDO Office, the main work is to capture the correct and all the relevant details of its employee. The following are the initial details types of employees required to be captured by the DDO Office:
- Basic details- It consists details of employee related to:
- Personal Information's
- Posting details
- Pay details
- PF / details
- CGEGIS / CGHS details
- ID / Contact details
- Bank details
- Government Quarter Allocation details (If applicable)
- Physical Disability details (If applicable)
- Loan and Advances details (If applicable)
- Recovery of Excess Payment details (If applicable)
Ans. The Employee details at first can be captured online through user friendly Forms. Apart from this there are three methods which can be utilized for preparation of Employee Master Data/ Initial Data Entry. All details for different methods are available at “Establishment→Data Porting Tools” at DDO Maker Level only.
- Offline Data Entry: A Utility named “ODE Application” is provided along with its Manual to capture the Basic Details of Employee by EIS.
- From Other Software: If DDO is using other software, the basic details of employees can be extracted from it in the desired File – Format for incorporation in EIS by following the user manual procedure provided therein.
- Upload Data from CompDDO: If the DDO is using Comprehensive DDO Package of ACID NIC, the details of employees along with Bank & Loan Details can be incorporated in EIS. The User Manual and Utility for extraction of data from CompDDO are available at the link mentioned above.
Ans. The User Manual is provided at the link “Establishment→Data Porting Tools→ Upload Data from CompDDO” in the login of DDO Maker.
Ans. The best method for capturing Master Data details is Online Entry Method only, if the no. of Employees is less. In case of large no. of Employees, Offline Data Entry may be utilized. However, this falls under the jurisdiction of DDO Office being rollout for EIS.
Ans. When the Employees' details data incorporated in EIS from CompDDO, the system auto generate 12-character Employee Code in the system. The details of such employee may be mandatorily deleted from EIS in the following manner:
- Initially these employees' details are being shown in “Unverified” status. Save the details of these employee for three tab details i.e. “Personal Details”, “Posting Details” and “Pay Details”.
- After filling of details it will be shown in Verified (partial) status. Now delete these details in reverse order i.e. first delete “Pay Details”, then “Posting Details” and finally “Personal Details”. Thus details of such employees will be deleted from your DDO EIS database.
Ans. The “Initial Data Entry” in respect of employee is discussed in the Q. No. D.1 above. The details of the employee are required to be captured step by step in the sequence as mentioned below:
- To fill the Basic Details of employee:
- Use the option Establishment→Employee→Initial Data Entry and select the Type of employee as Regular Employee
- Click on the option “Add New Employee” at Left Pane above and then select either of the option “Pensionable Employee” or “Under New Pension Scheme” as per case.
- Now fill the details of each form from “Personal” to “ID/Contact Details” as per sequence given one by one.
- To fill the Bank Details, use the option Establishment→Employee→Bank Details.
- For allocation of Govt. Quarter, use the option Establishment→Employee→Govt. Accommodation→Allot Quarter, if required.
- The details of Physical Disability of employee can be entered through option Establishment →Employee→Physical Disability Details, if any. In this option only those Employee will be listed for which the “Physical Disabled?” option has been saved as “Yes” in the Form Basic Details→ID/Contact details.
- If for the employee, any Loans/Advances recovery is going on, use option Establishment → Loans / Advances→Loan Already Taken.
- For the excess payment recovery, if any, the option Establishment→Loans/Advances →Recovery of Excess Payment may be used. This Form has option to enter details of recovery form “Salary” and “Other than Salary” pertaining to current year or previous year.
Ans. Precautions should always be taken for every data entry in the system. However, while filling details of employee details Online, care should be taken for details entered in the Form “Personal” as after saving it for just once, it cannot be modified. The system displays appropriate message before confirmation on save. So precautions should be taken for correctness of data entered in the Form “Personal” before saving it. If mistake observed after saving only personal details (1st tab), the details may be deleted and re-entered with correct information. However, if discrepancy noted after bill generation/locking & verification of data, Change Module has been provided for necessary correction at DDO Maker Level. Such corrections are required to be verified by DDO Checker also to have its effect in system.
Ans. The following are the colour coding scheme for status of Employee data entry in EIS:
- Grey Colour: It means the Basic Details (as referred in Q. No. D.1 above) are not filled.
- Blue Colour: It implies that Basic Details have been captured at DDO Maker Level only.
- Green Colour: It indicates that the Basic Details and Bank details (also other details as may applicable) are filled by the DDO Maker and are subsequently Verified and Locked by DDO Checker.
Ans. The Personal Details of the Employee contains prime data related to employee on the basis of which System generates Employee Code (of 12 characters) which further used as reference to all others details of the employee in the system. As such, the details of personal tab locked after saving only once. If mistake observed after saving only personal details (1st tab), the details may be deleted and re-entered with correct information.
However, if discrepancy noted after bill generation/locking & verification of data, Change Module has been provided for necessary correction at DDO Maker Level. Such corrections are required to be verified by DDO Checker also to have its effect in system.
Ans. PAN can be skipped while entering the initial data entry, if not available. However, it is mandatory to fill the PAN within three months from initial data entry. The system will automatically stop the Salary in the absence of detail of PAN after three months.
Ans. The CGEGIS Membership date for new employee should be left blank who joined on or after 2nd January during current year. It will be reset in the month of Jan next year. The insurance part (1/3)rd will be deducted by the system even Membership Date left blank.
Ans. Such conditions can be handled in the following manner
- Transfer Case: Search the Employee through the option Establishment→ / Transfer→Joining after Transfer/Repatriation. If the Employee is not available in the above link, ask the previous DDO Office to Transfer the Employee from their EIS Portal. Now this Employee will be available and can be joined using above link.
- If not the Transfer Case: The data of the employee is just entered by the other DDO (may be incorporated through CompDDO database, etc.) and it is in Unverified condition. Ask the Other DDO to delete the employee's details. If deleted, you can enter the same in current DDO.
Ans. In such cases when Internet Connection lost while saving Personal Details, employee not listed in the left pane as it failed to associate with PAO-DDO Code combinations. The partial data saved in such conditions are deleted automatically after some time. It is advised that you should wait for at least 2 hours before entering the details again.
If the problem still persist, please contact ITD, O/o CGA giving full details of employee and DDO Office at email id pfms-eis@gov.in for deletion so that details can be entered again at DDO end.
Ans. There are two scenarios of this condition:
- If the details entered are duplicate
- If the details entered pertains to another employee and not a duplicate case.
In the case (b) above you are required to select “Allow as a Valid Entry (No Duplicate Entry)” and save through the option Establishment→Utility→Approval/Rejection of Duplicate Employee by login in PFMS-EIS by DDO checker.
Ans. The other details required to be captured in the System after initial data entry are given in Q. No. E.1 above.
Ans. The details of employees are locked (is in green colour status) and required to be changed.
- If first Pay Bill have been generated for this employee: Unlocking of data is NOT allowed and the required details can be changed only through Establishment→Changes option.
- If No Pay Bill have been generated for this employee: Unlocking of employee details is allowed in this case through the option Establishment→Utility→Unlock Employee Details by DDO Checker. All details except Personal Details can be modified/changed as per requirement. Again, the data can be verified and locked.
Ans. Yes, but it is possible till generation of first Pay Bill in respect of any employee. The option for unlocking employee details is provided in Q. No. E.11 above. However, if Pay Bill has been generated, no unlocking of details is allowed. For modification in employee data, required option are provided in Change Menu.
Ans. The option of entering Bank Details in respect of an employee is available at Establishment→ Employee→Bank Details. In this Form fill the details of IFSC Code and click on go button. The name and branch details of bank will be automatically displayed by the system. Now enter the Bank Account No. in the field provided and save it.
Ans. The change in bank details may be done in accordance of the status of data entry of employee details, as mentioned below:
- If the Employee Details are not verified: The changes may be done through the option Establishment→Employee→Bank Details directly correcting the details.
- If the Employee Details are verified & locked AND No Pay Bill has been generated: For this Employees details are required to be unlocked using the option Establishment→Utility→ Unlock Employee Details. After unlocking, the bank details may be corrected as per point (a) above.
- If the Employee Details are verified & locked AND payment has been made through EIS: In this case the use the option Establishment→Changes→Change in Employee Details→Bank Details. For effect in system, it is required to be verified by DDO Checker.
Ans. After the process of Salary Bill, no change is allowed in the system for the employee for whom bill has been generated.
If the changes are required to be made in the bank detail, ask the concerned authority (PAO/DDO Checker) to return the bill in system. If the bill is returned to DDO Maker level, delete the bill and make the changes required in the bank details and verify it at DDO Checker level. Reprocess the Pay Bill (after generation of PFMS Unique ID) and forward it for passing.
Ans. On receiving such error, please contact and give the details of Bank and Branch Name along with its IFSC code to the ITD, O/o CGA for addition in the Central EIS Database through email at pfms-eis@gov.in.
Ans. The change of Bank Details after processing of salary bill has not been allowed. Please ask the DDO Checker/PAO to return the bill. Make the correction in the bank details and reprocess the Pay Bill and forward the bill for passing.
Change in Bank details should be made before processing of Salary Bills.
Ans. The details of allocation of Government Quarter to an employee can be captured through option Establishment→Employee→Govt. Accommodation→Allot Quarter. Only after verification of Quarter Allotment by DDO Checker, there will be effect on HRA and License Fee.
Ans. The quarter vacation details may be captured through option Establishment→Employee→Govt. Accommodation→Vacate Quarter. The same should be verified by DDO Checker to have its effect on Pay Details.
Ans. In such case check the following points:
- The details of Govt. Accommodation have been verified by DDO Checker or not. If not, verify the same.
- If the Govt. Accommodation details have been verified by the DDO Checker, assign Pay Rules to this (specific) employee, the system will now remove the HRA amount and shows the License fee in deduction part.
Ans. The Pay & Accounts Office may be contacted in case Custodian details are not available while filling Govt. Accommodation details of an employee. The access right for creation of Custodians is lying with PAO Offices in EIS. The DDO office provide the details of “Name of the Quarter Pool Type” and related Scheme Code (Functional Head) to the PAO Office. With login in PFMS-EIS, PAO can create the Custodian Series using the option “Employee Information System→Reference Data→Creation of Master Custodian”.
Ans. The access of entering revised rate of License Fee is available to DDO Checker. Go to option Establishment→Utility→ Change in Rent Details (Quarter Already Verified). Through this form revised rate of License Fee can be entered in the system.
Ans. Please follow the answer of the Q. No. F.10 given above.
Ans. The recovery of arrears of license fee can be made through the Regular Salary Bill. At DDO Maker level select the option Pay Bill→Arrears→ Arrears of any Pay item (Paid with Regular Bill). To enter the Arrears amount of License Fee, select the employee and Pay Month. Now in the Arrears Details select the corresponding pay item i.e. License Fee. Fill the period of recovery and amount. Enter the remarks as applicable (optional). Save the records. When regular salary bill processed, the recovery of License fee will be automatically reflected in the deduction part of the salary.
Ans. At present as per the Govt. Rules the following Loans and Advances exist:
- Computer Advances
- House Building Advances
- GPF Advance
- Car Advances
- Scooter Advances
Ans. Some of the Forms in the EIS are in frozen/Disabled Status. To enter the loans details, you are required to click on “New” Button available at Top Right side of the page.
Ans. The details of Loans Already Taken can be entered/captured in the following manner:
- Go to option Pay Bill→Advances→Loans Already Taken.
- Select an employee from the Left Pane. Click on the “New” button.
- In the “Disbursement Details” select the Type of Loan and enter Sanction Number, Sanction Date and Sanction Amount in the respective fields.
- The “Recovery Schedule” by default shows the details for capturing Principal Part of the Loan and the first Field is “Total Loan taken” (automatically filled and equal to sanction amount).
- If the Principal part of the loan is already recovered, click on Interest (highlighted in Yellow Colour). The system populate message for confirmation of recovery of full amount of principal. On clicking “Yes”, the “Total Loan taken” will be replaced with “Total Amount of Interest” text.
- In case of Principal recovery, fill the instalment amount and Last Instalment No. paid. In case of Interest recovery, the details of Total Interest Amount, Instalment Amount and Last Instalment No. paid are required to be filled.
- Save the records. The loan details are captured now.
- The loan details are not required to be verified by DDO Checker. After saving the records of loan details, the same are locked when next pay bill are generated.
- For the deputationist, option is provided for selection of Scheme code for booking in Receipt Head (MH 7610/0049) OR Suspense Head (MH 8658) as per requirement)
Ans. If one of GPF Advance recovery details had been already captured in the system and is still going on, and another details of GPF Advance is required to be captured, the same process of capturing GPF Advance Recovery will be required to be followed. As soon as new advance details are entered in the system, the system prompt for the merger of outstanding balances of earlier GPF Advance with amount of new GPF Advance and gives option for new installment amount. On entering the requisite information, the system saved the Advance forms with total amount (equal to sum of outstanding amount plus new advance amount).
Ans. No, the interest amount on the loan is required to be calculated manually by DDO. The same should be get verified by PAO office before entering into the system.
Ans. The precaution should be always taken for every data for its correction. However, special precaution should be taken for “Last Instalment No. paid” as it effects the less or more recovery.
Note: The “Last Instalment No. paid” reflected in the draft salary always shown as the no. of instalment of the previous month. But in the Pay Bill it will show as per current month details.
Ans. Option for capturing Multiple Instalment Recovery is available at DDO Maker at Pay Bill→Advances→Multiple Instalment Recovery. Use this form to specify No. of instalments to be recovered from the current pay month in case any employee wants to repay multiple instalments. Please note that changes will be effective after Paybill generation.
Ans. Use the form given at link Pay Bill→ Advances→ Conversion of GPF Advance to Withdrawal. Please note that changes will be effective only after verification by DDO Checker.
Ans. Pay Bill→ Advances→ Recovery Through Challan. Use this option to enter the Installments Amount recovered through challan & not through Monthly Paybills, so that the Recovery Details can be updated. Please note that changes will be effective only after verification by DDO Checker.
Ans. Use the form given at link Pay Bill→Advances→Change in the Last Instalment Number Paid/Recovered. Fill the correct Last Instalment Number Paid in the revised details. The outstanding amount will be calculated automatically. Please note that changes will be effective only after verification by DDO Checker.
Ans. To correct the Loan Type, option is provided at Pay Bill→Advances→Change in Loan Type.
Ans. The request for revision of recovery schedule can be processed through Pay Bill→ Advances→Revision of Recovery Schedule.
This option is to be used when the Instalment Amount is changed, and therefore total number of instalment is to be changed without changing the loan amount. Please note that changes will be effective only after verification by DDO.
Ans. For the excess payment recovery, the option Pay Bills→Advances→ Recovery of Excess Payment may be used. This Form has option to enter details of recovery form “Salary” and “Other than Salary” pertaining to current year or previous year. User can save maximum of two recovery of each type i.e. from Salary and Others. Note: In this form there is option to select Scheme Code (Account Head) as per recovery type i.e. from Salary and Other than Salary. For the “Other than Salary” the availability of Scheme Code depends on the budget data fed by PAO Office. If the concerned Scheme Code is not available, PAO Office may be contacted for the same.
Ans. The same process as mentioned in the Q. No. G.13 above. For the recovery pertaining to previous year, it may be ensured that Deduct Recovery Head ( Minor Head 911) corresponding to scheme code should be already mapped to DDO. If not, PAO may be requested to map the same.
Ans. There are three types of different reports available for Loan/Advances at Pay Bill→ Advances→Loan Related Reports, as mentioned below:
- List Showing Outstanding Loans
- Loan Type Wise List of Employees
- Loan –History of Employees
Ans. The Bills Groups created by system against a Scheme Code (Account Head) are called Default Bill Groups. It is required to be created once in a financial year. Yes, it is necessary to create them. If not created, the system will not allow further to create/modify bill group and attached/detach employee from a Bill Group.
The system creates three default bill groups for each Scheme Code as under:
- Bill Group for Pensionable employees (Regular Bill)
- Bill Group for NPS employees
- Bill Group for Supplementary Bill
Ans. Yes, the name of the default bill groups can be modified as per requirement of the Office/DDO user. The option is available at Pay Bill→Bill Groups→Create/Modify Bill Groups. Select the Bill Group from the grid and modify the details as required.
Ans. The default Bill group “Supplementary Bill” remain hidden and utilized when supplementary bills are processed for an employee/s.
Ans. The additional bill groups, if required, may be created using the option Form available at Pay Bill→Bill Groups→Create/Modify Bill Groups.
The bill groups can be created based on the following criteria:
- On the basis of Employee Type i.e. GPF, NPS, Co-Terminus or Re-Employed Pensioner.
- Second filter is based on Group i.e. A, B Gazetted, B Non-Gazetted, C or D OR any combination of Group as per requirement by DDO
Ans. When an employee details are verified and locked by DDO Checker and employees PFMS Unique ID have been generated by the system, the employee will be available for attachment to a bill group.
Ans. The probable reasons for non-availability of an employee for attachment to a bill group may be due to following reason/s:
- The employees' details have not been locked and verified by DDO Checker.
- The PFMS Unique ID has not been generated.
- The Mobile Number details are not correct. Please note that mobile number is not mandatorily required for generation of PFMS Unique ID. However, if entered in the system, it must be correct.
- The employees' details have been just locked and verified. A maximum of two-four hours required for generation of PFMS Unique ID after locking of the details.
- It may be possible that employee Designation Group (A, B Gz, B NGz, C or D) is different from Bill Group's “Group”. For example, the Employee belongs to B Non-Gazetted Group and we may try to attached them in a Bill Group having Group A and B Gazetted.
- It may be possible that the employee may have already been attached to any other bill group. The same can be checked through the option Pay Bill→Bill Groups→View Bill Groups attached to employee.
Ans. Just detach the employee from the Bill Group where he/she is attached.
Ans. In the following circumstances an employee automatically gets detached from a bill group:
- When promotion details are entered and verified. Since, after promotion, the employee designation may be changed and it may be belonging to Group other than previous group.
- When an employee gets transferred to other DDO.
- If the employee Superannuation Age reached, the system will automatically detach or stop salary.
- In first month of rollout of EIS in DDO, if an employee is attached to a bill group, and its details are unlocked for any correction, the system automatically detach it from group.
Ans. No, once the Bill Groups are created and all employees are attached to respective bill groups, no further month-wise bill groups should be created. Every month Pay bill generation may be done with same bill group and pay bill cycle may be completed i.e. till “Post to PBR (EIS Bills).
It is necessary to complete the bill cycle as without its completion, the system will not allow to generate the pay bill for the next month.
Ans. The Functional head i.e. Departmental Canteen OR all heads other than object head-01 should be mapped by PAO from PAO login at EIS-Reference data, and also allot DDO-wise budget allocation then only scheme will available on EIS for Bill groups mappings.
Ans. The following are the complete steps for processing a regular salary bill in EIS:
Processing at DDO Maker Level:
- The option is given at Pay Bill→Pay Bills→Pay Bill Processing. Select the Month and Bill Group, click on Process. The Bill is processed successfully.
- If any employee in this Bill Group have Non-Government Recovery, click on Pay Bills→Non-Govt(NG) Recovery→NG Recovery Processing. Select the Month, click on Bill ID and process the NG Recovery. If there is no Non-Governmental Recovery attached to any employee in this Bill Group, skip this step.
- View & Forward the bill to DDO Checker Level using the option Pay Bills→View & Forward. Click on the bill. Check GAR 13 (Outer), MTR 13-A(Inner) and all other reports/schedules thoroughly. Take prints of all reports. Click on “Forward” button for submission to DDO Checker.
- Please note that if in the processed bill, any employees' deductions are exceeding the gross pay, the “Forward to DDO” button will remain disabled. In such case use the option “Remove deduction from the Bill” to remove one or more deductions so that Net Pay is greater than 0 (Zero).
- Also, if the Non-Government Recoveries in the bill exceed the Net Pay for any employee in the bill, corresponding message will be displayed and Maker will not be able to forward the bill. In such case select the option “View Pay details after NG processing”. The report will show Gross Pay, Net Pay and Net Pay after NG Deductions for each employee in the bill. Those employees with negative “Net after NG recovered” Pay will be shown in Red Colour. Please make changes in the NG Recovery for such employees and reprocess the NG Recovery.
- Forwarding to PAO/CDDO option is given at Pay Bill→Pay Bills→Verification of Pay Bills. Select on the Bill Group/ID and check the related details of Pay Bill.
- Take out all the prints out of reports/documents if not taken at DDO Maker level.
- Select the Payment Mode and enter the NPB Date and forward the PAO/CDDO.
- In case of DDO who has been activated for E-Payment in PFMS, voucher generation is automatic and voucher details are not to be entered. For such DDOs mode of payment is “E-Payment”. For the NDDOs attached to CDDOs/PAOs if the CDDOs/PAO is not on E-Payment on PFMS, the mode of payment is only Cheque and voucher details have to be entered in the System.
- When the Voucher Entry of Pay Bills has been done, for each bill, Post Paid Updation and Post to PBR (EIS Bill) are required to be completed, option being given under Pay Bill at DDO Checker Level. Until these both steps are completed after voucher entry, system will not allow to generate pay bill in respect of these bill groups for next month.
Ans. For each bill passed in the previous month, Post Paid Updation and Post to PBR (EIS Bill) are mandatorily required to be done/completed after Voucher Entry of Pay Bills done in the system, option being given under Pay Bill at DDO Checker Level. Until these both steps are completed after voucher entry for each bill, system will not allow to generate pay bill in respect of these bill groups for next month.
Ans. The extraordinary leave details of employee are required to be captured at the option given at Establishment→Leave/Suspension→Leave Sanctioned. After its verification by DDO Checker, the system will restrict the pay according to details of extraordinary leave entered. Please note that only current months' leaves will have its effect in current month salary. If the leave details pertain to previous month, the corresponding amount may be calculated manually and recovered through “Recovery of Excess Payment”.
Ans. The following details must be checked before process of regular month
- Enter and Verify Leaves sanctioned for the pay month.
- Enter and Verify unauthorized absence, if any (including leave pending sanction).
- Enter and Verify "Suspension" details, if any.
- Enter new loans/advances along with Recovery Schedules.
- Enter and Verify the Order for "Multiple Instalment Recovery", during the pay month, if any.
- Enter "Loan recovery by challan", if any.
- Enter and Verify Govt. Quarter Allotted, if any.
- Enter and Verify Govt. Quarter Vacated, if any.
- Enter and Verify Transfer and Relieving details of employees as per transfer orders.
- Enter and Verify "Joining" details of employees, joining your office after transfer with or without promotion from another office.
- Enter and Verify details of Promotion/Reversion without transfer (i.e. within the same office), if any.
- Enter and Verify "Pay Fixation" of employees on promotion or reversion or any other reason.
Ans. When a pay bill is returned by PAO Office, first check the status of bill. If the status of bill is “Returned by PAO”, then this bill is available at DDO Maker level. After the necessary correction to remove objection raised by PAO Office, just reprocess the bill. The reprocess of bill is same as processing of any bill for a month.
Ans. After required correction, the bill may be processed again to bring the changes in the already processed pay bill. However, in case, if the bill is available at DDO Checker level, for any correction, it can be rejected by DDO Checker. It will now be available at DDO Maker level. After necessary correction, the bill may be reprocessed and forwarded to DDO Checker again.
Ans. In both case bill is required to be returned by DDO Checker/PAO Office for necessary modification at DDO Maker Level.
Ans. When any changes are made after bill processing and bill is still with DDO Maker, reprocessing is required to get the changes effected.
When a pay bill is forwarded to DDO Checker/ PAO Office, a shortcoming is noticed in the Pay Bill, the DDO Checker/PAO Office may be contacted for returning the same. When pay Bill become available at DDO Maker level again, first pay bill is required to be reprocessed again to access the details the Pay Bill.
Ans. The CDDO passes his own salary bills and another NCDDO's salary bills in PFMS portal. If any shortcoming noticed in pay bill then return that bill as under:
- After returning own salary bill from PFMS portal, pay bill is available in EIS on Maker level after a time span
- On returning NCDDO's salary bill from PFMS portal, one more action requires to be done by NCDDO as GoTo Sanction menu →Manage, search and open the sanction number and return pay bill from return option available at lower end. After that salary bill is available in EIS on NCDDO's Maker level after a time span.
Ans. If the bill has already been forwarded to DDO Checker or to CDDO/PAO in PFMS, attachment or detachment of any employees to the corresponding bill group is not allowed until the bill cycle is completed i.e. until voucher generation.
Ans. The status of Pay Bill may be known through the option Pay Bill→Pay Bills→ View Pay Bill Status. The Bills have following different status as per detail below:
- Verified and Locked by DDO: It means that bill have been verified and forwarded to PAO/CDDO for passing.
- Data successfully uploaded to PFMS: It imply that bill details have been successfully sent to PFMS server from EIS server. The bill is available at PAO DH level for receiving.
- Voucher Entry Done: It means that PAO passed and payment has been made.
- Rejected by PAO: The bill is rejected by PAO office for necessary modification as per observation.
Ans. After verificatication of pay bill from DDO Checker, bill status is showing as 'Bill verified and locked by DDO-Awaiting upload to PFMS', it means bills are on queue to be uploaded on PFMS Portal & will upload soon.
Ans. For removing the errors from salary bill, following step/actions has to be done:
- Select the Bill ID to view the Error Details return to Maker through the option “Pay Bill→Reports→ Details of Failed Bill in PFMS”(at DDO Checker Level only). Note the error details carefully.
- Make the necessary change for correction/updation in the EIS Bill.
- “Recovery of Excess Payment” captured during previous financial year and which installment is/are still pending, the Budgetary Account Head is required to be changed to the Deduct Recovery Minor Head - 911 of the concerned head of account. This can be done by DDO Maker only through option “Pay Bill→ Advances→Changes→Change in Advance Scheme →Excess Recovery”
- If Deduct Recovery Head is not available for the current FY in the EIS system, PAO Office may be contacted for mapping the same and allocate atleast '0' budget.
- Re-Process the EIS Salary Bill as per normal course of action.
"Data could not be uploaded due to error/Locked"
| Error in EIS Salary Bill | Resolution of errors |
|---|---|
| Account Head Mapping is missing for account heads (2059800011600015), Please contact PFMS cell. | Request PAO Office to map the Account Head and allocate budget under functional head shown in the error descriptions for your DDO. |
| Account Head Mapping is missing for deduction heads (2011011020100-01-5, 2011011020100-01-5, | Request PAO Office to map the Account Head 'Deduct Recovery' and allocate '0' budget pertains to your DDO.And, Return the bill from Checker login at Paybill→Report→Details of failed bill on PFMS and note the Error descriptions. The error occurs when the account head of running recovery of excess payment not changed to Deduct Recovery - Minor Head 911. Change should be carried out in Maker level at PayBill→Advance→ Changes→ Change in Advance scheme→Excess recovery …. Select Office/designation/employee/already save details ….. Select 'Scheme to be recovered' as Minor Head-911 and save and process the salary. |
|
In DDO Checker Level after selecting the error details (), the name of the employees is/are shown in red colour for which error has been occurred in the Bill. It can be easily identified and same may be corrected before re-generation of Pay Bill after doing assign pay rules for specific employee. |
| For Account heads (2016001020100015), DDO Wise Budget Allocation is not available in PFMS or Grant P | Budget Allocation has not been available in mentioned functional head. Request PAO Office for needful. |
| For Deduction heads (2011019110000705), DDO Wise Budget Allocation is not available in PFMS or Grant | Request PAO Office to make “Zero” Budget Allocation for Deduct Recovery - Minor Head 911 for your DDO. |
| For Deduction heads (2055000040104135), DDO Wise Budget Allocation is not available in PFMS or Grant | This error occurs when the account head of running recovery of excess payment (Other than Salary) not changed to Deduct Recovery - Minor Head 911 OR the recovery pertains to employee who have just joined the current DDO. Necessary Steps already suggested in the Notice Board of EIS. |
| Gross amount of each beneficiary must be greater than 0 | Payment amount should be greater than Zero i.e. Total Recovery can’t be equal to Gross Amount. Reduce the recovery as required. |
Ans. If basic pay of an employee has been captured incorrectly, the same could be corrected through “Establishment→Changes→Correction in Pay Details” at DDO Maker Level. It should be noted that it will be effective only after verification by DDO Checker.
Ans. The Annual Increment in the month of January and July may be released as under:
- First go to the Establishment→Changes→Release of Annual Increment→Regular Annual Increment. Select the Office, Pay Commission and Month and fill the details of Annual Increment Order with Date. Keep the name of employees as per order and remove the rest of employees who are not covered under this order. Change the “Increment Date” for the employees, if required (for employee who were on leave on first working day in the month of Jan/July). Save the details.
- The saved details of Annual Increment Order will now appear in a grid above on the form. Click on the Annual Increment Order and then click on “Forward to DDO”.
- Verify the details of Annual Increment Order at DDO Checker level to make the effect.
Ans. Annual Increment may be released from option available on EIS Module in Maker level at Establishment→Changes→Release of Annual Increment→Regular Annual Increment→Select Office→ Select Designation →Pay Commission→ Salary month→Click GO→Add New Order Details/Date→ Click GO → Attach the employee with increment Certificate Order and Save. After saving & selection of Increment order the ‘Forward to DDO’ Tab gets enabled.
Ans. First promotion details are required to be captured and verified in the system. The detail of promotion can be entered at Establishment→Promotion/Transfer→Promotion/Demotion (without transfer).
After verification of same by DDO Checker, the employee will be available for Pay-Fixation through the Form given at Establishment→Changes→Pay Fixation→Promotion/ Demotion.
Ans. If TA rate is shown at normal rate for physically disabled employee, check the following points:
- Check whether Physical Disability details have been filled provided at Establishment→Employee→Physical Disability Details. If not, fill the required details.
- If the details have been filled as per point (a) above, make sure that the field “Entitled for Double TA” has been marked as 'Y'.
- If above details are in accordance as suggested, check whether it has been verified by DDO Checker or not. If not, verify the same using option Establishment→Verification→ Verification of Pending Task.
- After confirmation of above three points, assign Pay Rules [Pay Bills→Rules for Employee→Assign Pay Rules to a Specific Employees. TA will be now shown at double rate as applicable.
- If “No Pay Bill has been generated” for this employee, unlock the employee details and make the required changes under the ID/Contact details.
- If “Pay Bill has been generated”, the required correction may be done using the option Establishment→Changes→Change in Employee Details→Physical Disability Details and complete the steps as mentioned in point (a), (b) and (c) above.
- If entitled for Double TA has not been marked as 'Y', make the necessary correction through Change Menu.
Ans. For the officials having Pay Level 14 and above, if the applicable TA Amount is Rs.15750+DA, the option “Entitlement for Office Vehicle” should be selected as “Yes”, in the Basic Data→Pay Details Form. (Establishment→Employee→Initial Data Entry→Pay Details”)
If this has been saved as “No”, correction may be done through Establishment→ Changes→Change in Employee Details→ Entitlement of Office Vehicle. Please note that it should be verified by DDO Checker and Pay Rules should be assigned for taking effect in the system.
Ans. In case opted for Office Vehicle, the TA may be stopped adding the exceptional rule of “TA Not Admissible (Office Vehicle)” using the option “Pay Bills→Rules of Employees→ Eligibility of exceptional Allowances/Deductions for a specific employee”.
Ans. There is only requirement of Pay Rule Assignment for these employees. The system will now calculate higher rate of TA as applicable.
Ans. At present, for removing TA for employee on leave for full month, the option is as under:
- After bills are prepared (with TA) at DDO Maker level, while forwarding the Pay Bill to DDO Checker, there is option given on the link “Remove Deduction/TA From the Bill” just above the “Forward” button. Click it on, select the employee. The all deduction details of this employee will be visible now. Tick on the check box against the Transport Allowance.
- Now click on “Save and ReDisplay” Button. The amount of Transport Allowance become Zero now.
- Finally click on the option “Regenerate MTR 13-A(Inner)” button. The Transport Allowance has been removed for this employee, verify the same for MTR 13-A(Inner).
Ans. For all the employees eligible for higher rate of TA make change in City Class for TA as under:
- In case of New Employee (First time entry in EIS): While making Initial Data Entry under the Posting Details→Current Posting Details Select City Class for TA as “Class X”. It may be noted that “City Class (where employee is working)” is meant for HRA purpose only.
- If the employee Details are verified and Locked Use the option “Establishment→Changes→Change in Employee Details→City Class for TA” as X Class. Verify it from DDO Checker and assign the Pay Rules.
Ans. For all the employees eligible for lower rate of TA make change in City Class for TA as under:
- In case of New Employee (First time entry in EIS): While making Initial Data Entry under the Posting Details→Current Posting Details Select City Class for TA as “Class Y”. It may be noted that “City Class (where employee is working)” is meant for HRA purpose only.
- If the employee Details are verified and Locked Use the option “Establishment→Changes→Change in Employee Details→City Class for TA” as “Class Y“. Verify it from DDO Checker and assign the Pay Rules.
Ans. Those Allowances which are applicable only to certain employees based on their special work/ nature of duty/place of duty/administrative admissibility are defined as Exceptional Allowances in the system Viz. Non-Practice Allowances for Doctors, Hospital Patient Care Allowances, Special Duty Allowances, etc. The exceptional Allowances/Deductions can be added to a specific employee through the option available at “Pay Bills →Rules of Employees→ Eligibility of exceptional Allowances/Deductions for a specific employee”.
Note:
- After saving the exceptional allowances, Pay Rules may be assigned and if its amount is non-computational, the amount is further required to be saved in the Dues part through the option Pay Bill→ Rules for Employees→7th Pay Allowances and Deductions
- These rules are not required to be verified by DDO Checker. When a particular (exceptional) rule which is already saved for any employee, is now, not applicable, the same can be deleted at DDO Maker level.
Ans. The deduction of NPS Tier-I for New Pension Scheme employee is system automated in the EIS. The system itself deduct the NPS Tier-I contribution automatically at the required rate.
Ans. Computational Pay items are those dues and deductions which are automatically calculated by the system as per rule applicable to employee.
The Non-Computational Pay items are those dues and deductions which are required to be entered in the system manually for each employee as per rule applicable.
Ans. There is requirement of assigning Pay Rules to the employee. After Pay Rule Assignment to this specific employee all computational dues and deductions will be shown in the draft salary.
Ans. For the employees drawing pay & allowances as per 6th CPC, the option for capturing details of dues and deductions in the system is available at Pay Bill→Rules for Employees→Non Computation Dues/Deduction at DDO Maker level.
The provision for capturing details of pay fixation from 6th to 7th CPC has been given at Establishment→7 Pay Commission→Pay Fixation for 7 PC→Pay Fixation Entry.
Ans. Yes. The CPF contribution for re-employed pensioner can be entered by using the option Pay Bills→Rules for Employees→7th pay Allowance and deductions→Select Employee→Enter/Modify Deductions at DDO maker level.
Ans. FA & AFA allowances are given under exceptional allowances. Follow the steps at maker level
- Add the Rule: Pay Bill→Rules for Employees→Eligibility for exceptional Allowances/Deductions for a Specific Employee. Select the Employee and then admissible rule of allowances. Enter the details and save the form.
- Enter the Amount: Pay Bills→Rules for Employees→7th pay Allowance and deductions→Select Employee→Enter/Modify Deductions.
Ans. Debit Bill Statement is not necessary to attach with the bill, because all such details are available with Nil Bill. Now onward, this schedule will not be available.
Ans. No, there is no such option if the salary bill is processed. If not, then we can unlock employee details and change the Pay Details. So be careful while filling details of an employee.
Ans. DNI date is to be changed in Maker level at Establishment→Changes→Pay related→Change in increment date(as per Rule 10), do not change Basic Pay this page. After changing DNI as 01/01/20xx or 01/07/20xx, do Release of annual increment.
Ans.Process flow of Pay fixation in case of NFS/MACP w.e.f. Date of Promotion is as under (same is also available at pay fixation entry page) :
"Process flow w.e.f. Date of Promotion"
| DDO Maker Level | DDO Checker Level |
|---|---|
| Step 1(a) :- Save Promotion order Details: Establishment→ Promotion/Transfer→ Promotion without Transfer → Promotion……and select “Pay fixation effect on�? as Date of Promotion | Step 1(b): Then verification by DDO Checker |
| Step 2 (a):- Pay Fixation on Promotion Establishment→ Changes→ Pay Related→ Pay Fixation→ Promotion/Reversion | Step 2(b): Then verification by DDO Checker |
"Process flow w.e.f. DNI"
| DDO Maker Level | DDO Checker Level |
|---|---|
| Step 1(a) :- Save Promotion order Details: Establishment→ Promotion/Transfer→ Promotion without Transfer → Promotion……and select “Pay fixation effect on�? as Increment Date | Step 1(b): Then verification by DDO Checker |
| Step 2 (a):- Pay Fixation on Promotion (To grant benefit in the next pay level w.e.f. NFS/MACP date) Establishment→ Changes→ Pay Related→ Pay Fixation→ Promotion/Reversion | Step 2(b): Then verification by DDO Checker |
| Step 3 (a):- Pay Fixation on Promotion w.e.f. on DNI Establishment→ Changes→ Pay Related→ Pay Fixation→ Promotion wef DNI | Step 3(b): Then verification by DDO Checker |
Note: No need to process Annual increment in case of Promotion/NFS/MACP with option Pay Fixation “Date of Increment w.e.f. DNI�?
Ans. At present, almost all the details (data) related to an employee that can be corrected in the system are available under option Establishment →Changes→Change in Employee Details, except the following
- Provision for changing type of employee from Pensionable to NPS .
Ans. Employee type from NPS to GPF may be changed through the Form given at maker level using option:
Establishment→ Changes→ Change in employee type→ NPS to GPF and verify the same from DDO checker.
However employee type of employees who have joined the govt. Service after 01.01.2004 may be changed from NPS to GPF from DDO checker level through the Form given using option:
Establishment→Utilities→Change in employee type from NPS to GPF(Employee joined after 01.01.2004). Changes made by DDO Checker will be effective only after verification by PAO
Ans. The PAN/Aadhaar Number can be skipped due to non-availability at the time of filling initial data entry. When the details of PAN get available the same can be entered through the option “Establishment→Changes→Change in Employee Details→GPF/PAN/City Class”, whereas the details of Aadhaar can be capture through the option “Establishment→Changes→Change in Employee Details→Name/Aadhaar Number”.
Note: It may be noted that PAN details are required to be captured mandatorily within three months of “Initial Data Entry” of employee in EIS. In the absence of PAN details, the salary will be automatically stopped after three months.
Ans. The option for reset CGEGIS Membership date for such employee is available at DDO Maker Level “Establishment→Changes→Change in Employee Details→Reset CGEGIS Membership Date in the month of January next year before the generation of pay bill. This will be effective only after verification by DDO Checker and Assignment of Pay rules. However, the functionality for changing CGEGIS membership date for employee due to any other reason is given at DDO Maker Level “Establishment→Changes→Change in Employee Details→CGEGIS details
Ans. The following details should be followed in this case:
- First changes in Physical Disability details should be made as “Is Physically Disable” to “Yes” and then it is required to be verified by DDO Checker through the option “Establishment→ Changes→ Change in Employee Details→Contact/Physical Disability Details”.
- The employee will be now available at Establishment→Employee→Physical Disability Details where all details related to physical disability should be filled and saved. The saved details are again required to be verified by DDO Checker to have its effect in the system. Also, Pay Rules may be re-assigned again.
Ans. Use the option “Establishment→Changes→Change in Employee Details→GPF/PAN/City Class” for change in PRAN of a NPS employee. In the form so available click on the PF/NPS option, fill and save the revised details. For its effect in the system it is required to be verified by DDO Checker.
Ans. For the officials having Pay Level 14 and above, the rate of TPTA admissible is Rs.15750 plus DA. In order to allow/attach higher rate of TPTA i.e. Rs.15750 plus DA, it is required to select “Yes” for the option “Is entitle for Office Vehicle”. Wherever, in cases, where official having Pay Level 14 and above not entitle for office vehicle, the admissible rate of TPTA is at normal rate i.e. Rs.7200 plus DA.
Ans. Yes, for changing Sub-ordinate/Main office can be changed for an employee and option has been provided under Change module. Establishment→Change→Change in Office (Same DDO).
Ans. If the employee got promotion within same office, the details should be captured at the option provided at Establishment→Promotion/Transfer→Promotion/Demotion (Without Transfer). Select the Promotion “Option” button and fill the requisite details.
Please note that changes will be effective only after verification by DDO Checker. On verification, the Employee will be detached from current Bill Group automatically. New Bill Group should be assigned through “PayBill→Bill Groups→Attach/Detach employees to Bill Group” option at DDO Maker Level.
Further the Pay Fixation details are required to be captured through the option Establishment→Changes→Pay Fixation→Promotion/Demotion. It will be effective only after verification by DDO Checker.
Ans. On promotion and transfer only the transfer details are required to be captured in the system. The reason for the transfer may be chosen as “On Promotion”
Ans. Steps/actions for transfer of Employee's data from Old DDO to New DDO:-
I.Old DDO:
- DDO Maker login - GoTo Establishment→Promotion/Transfer→Transfer to another Office(General transfer/with Promotion/Any other reason) ----- Capture the information for Transfer to another Office on Promotion/Deputation/Any Other reason order details alongwith it relevant dates.
- DDO Checker Login - Verify the above transfer details.
- DDO Maker login - GoTo Establishment→Promotion/Transfer→Generate LPC→Transferred employee ….. select Office/Designation/Employee and generate LPC
- DDO Maker login - GoTo Establishment→Promotion/Transfer→ Joining after Transfer / Repatriation→ 'Search'the transferred employee by Employee Code/PAN/Aadhar number …… select & return and capture the joining information and relevant dates.
- DDO Checker Login - Verify the above transfer details.
- DDO Maker login make changes if change required for GPF Account numbers etc. and got verified from Checker.
Ans. The employee after promotion/general transfer may be joined in the current office, as under:
- Go to option “Establishment→Promotion/Transfer→Joining After Transfer/Repatriation” and click on “Search” button. Search details displayed at the bottom of this page. The transferred employee can be searched by input of any of “Employee Code”, “Name” or “PAN” details. Select the Employee from the grid and click on “Select & Return” button.
- The previous page will be displayed with filled “Relieving Details” by past DDO with option to fill current “Joining Details”. Fill the details and save the form.
- After verification of “Joining Details” by DDO Checker, the employee will be shown in the Employee List.
- If the employee joined the new DDO on Promotion, pay fixation details can be captured and verified in manner given in Q. No. J.4 above.
Ans. In case of transfer, after verification by DDO Checker, LPC should be generated mandatorily. If not, the New DDO will not be able to join the employee.
Ans. The same process as given in Q. No. L.3 above.
Ans. If the employee belongs to “Pensionable Services” following details are required to be changed at DDO Maker Level and verified by DDO Checker.
- GPF No. (Establishment→Changes→Change in Employee Details→GPF/PAN/City Class)
- City Class (for HRA, if applicable) (same as above)
- City Class (for TA, if applicable) (option as point (a) above and City Class for TA)
- Remove/Add the Exception allowances/deductions as applicable, if required.
Ans. The complete process of Transferring employee will be required to be followed wherein new DDO details will be chosen as “Not Known”. After transfer, the employee can be again joined in the same DDO under different Sub-ordinate office, following complete process of joining transferred employee in current DDO.
Ans. If the employee has been transferred with incorrect details viz. wrong date of relieving, new DDO details, increment option (in promotion case) etc, and subsequently verified by DDO checker, the Transfer order details can be reverted by DDO checker, option being provided at Establishment→ Utilities→ Revert transfer details.
Note: It is only possible till the new DDO not joined the relieved employee in system.
Ans. Provision for Re-joining state employee to Re-employed Pensioner on deputation is available now at Maker Level.
Process Flow – Establishment → Promotion/Transfer → Re-joining of End of Service Employee → Deputation from State to Re-employed Pensioner and enter the required details.
Note- Changes will be effective only after verification by DDO Checker.
Ans. Supplementary Bills are part payment of Salary in a particular month. When an employee relieved from an office/ joined new office in the mid of a month, the part payment of Salary is required to be paid accordingly by the previous office as well as new office. In such circumstances supplementary bills are required to be prepared.
Ans. There are four different options/situations for preparation of Supplementary Bill, as under:
- For Delayed Payment of Current Month
- For Delayed Payment of Past Month
- For Transferred Employee (with further option of Current Month and Past Month)
- For Suspended Employee (with further option of Current Month and Past Month)
Ans. Suppose we want to prepare the Supplementary Bill for Delayed Payment of Past Month, then we have to choose the option “Pay Bill→Pay Bills→Generate Supplementary Bills→ For Delayed Payment of any employee (Past period)” at DDO Maker Level. The Pay Month will be shown automatically. Now follow the procedure given as under:
- Select the Scheme Code.
- Select the Employee Type as “Delayed Payment for any Employee (Past Period)”
- Now select the Employee from the drop-down list available adjacent to it.
- Enter the “From Date” and “To Date” of the period of payment.
- Now click on the button “Enter Dues & Deductions for Past Period”. A new window will pop-up containing the default details of employee showing Basic Pay, City Class and Group. If the details are correct for the period of payment, click on “Save & Specify Dues Deductions”. If the default details are required to be modified for the period of payment, changes can be made accordingly.
- After saving the above details, the system will now allow the users to “Add” specific Computational Dues and Deductions as well as to enter Non-Computational Dues and Deductions. Saves each dues and deductions one by one and close the Form.
- Click the button “Process Bill” to generate the Supplementary Bill. You can now view the details of bill thus prepared.
- If any change is required, follow the above points to reprocess the supplementary bill again.
Ans. Yes, the system will allow to prepare two different Supplementary Bill in a particular month only if the period of payment does not overlap.
Ans. Yes, it is necessary, otherwise system will not allow to process bill for next month.
Ans. The system will automatically capture the details of recovery pertaining to Loan/Advances in respect of employee for whom supplementary bill is being generated.
Ans. While adding Computational Deductions, it is required to add “NPS Tier-I contribution” rule to deduct the same.
Ans. First we have to choose the option Pay Bill→Arrear→DA Arrears and then following steps are required for processing of DA Arrears Bills:
- Entry of DA Arrears
- DA Arrears Processing
- Due Drawn Statement printing
Ans. The DA Arrears Bills can be prepared for Regular Employees as well as Superannuated Employees in the following manner:
- Select Entry of DA Arrears option using Pay Bill→Arrear→DA Arrears. Click on “New” button to unfreeze the Form “Arrears Details”.
- In the Arrears Details Form input the details of Pay Month, Bill Group and Period of Arrears and click on “Go” button. The month-wise details of applicable DA Arrear amount will be shown for each employee.
- The above data may be shown in two different colour combination “Grey” and “Yellow”. The Grey colour indicates that DA Arrears amount have calculated based on the data already entered with a different bill (same or other DDO) in EIS. These details are for display purpose only. The Yellow colour indicates that the calculation has been done on the basis of DA amount Due since the Drawn amount of DA was not available in EIS.
- Check the DA Arrears amount month-wise for each employee. If required, correction may be done. Save the form.
- After saving the details, if any correction is required, the same can be done using the Edit button.
- Now DA Arrears can be processed for above saved data by selecting the second option under Arrears→DA Arrears.
- In the Form “Bill for DA Arrears” select the details of Pay Month, Bill Description (Bill Group), Pay Item (DA Arrears) and Period and click on “Process” button. The Bill of DA Arrears will have generated now and system will show the confirmation message. View the bill details on clicking View Bill option.
- The print of Dues Drawn Statement can be taken and attached to the Bill thus generated.
Ans. The
Ans. Before processing any DA Arrears Bill, Default Pay Rules applicable to all employees should be assigned using the option: Pay Bill→Rules for Employees→Assign Pay Rules to all employees.
Ans. No, the DA rate will be captured in the system by EIS Admin when DA Arrears O.M. issued by Department of Expenditure, Ministry of Finance, Govt. of India.
Ans. Yes, the system will automatically deduct NPS Tier-I deduction in the DA Arrears Bills as applicable.
Ans. The following types of Other Bills are available for processing through EIS
- Bonus
- Honorarium
- Leave Encashment on LTC
- Over Time Allowance
- Salary Arrears
- Tuition fee Reimbursement
Ans. The Other Bills can be processed through following three steps at DDO Maker Level:
- Capturing of Bill Details : The option is available at Pay Bill→ Other Bills→ Entry of Other Bills→To be processed through EIS. Click on "New" button and then enter and save the details of Bills viz. Sanction Number, Bill Type, Amount, Employee Name, etc.
- Processing of Other Bills : Pay Bill→ Other Bills→Other Bill Processing (EIS Bills)
- Forwarding to DDO Checker: It is given just below processing option.
Ans. The Other Bills which have been already processed through EIS before rollout can be captured in the system for the purpose of Income Tax Calculation. The option is provided at Pay Bill→ Other Bills→ Entry of Other Bills→ External Bills(Payment already made).
Please note details has to be verified by DDO Checker.
Ans. The leave details may be entered in the system using option Establishment→ Leaves / Suspensions. At present only leaves effecting the Pay are required to be entered in the system. There are four type of provisions/options for capturing leave details in the system:
- Leave Sanctioned
- Leave Cancellation
- Leave Curtail/Extension
- Conversion of Leave
Ans. The following types of reports are available in respect of Leaves in the system:
- Leave Details of an Employee
- Leave Details for Selected Leave Type
Ans. Yes, the option is available at Establishment→Leaves / Suspensions. The following provisions are present with respect to suspension in the system:
- Entry of Suspension/Abscond
- Revocation of Suspension/Abscond
- Regularisation after Suspension/Abscond
Ans. Yes, if an employee joins on Deputation, it is necessary to capture the deputation details. While filling employee “Initial Data Entry”, under the Posting Details, select “Current Posting Mode” as “Deputation In (From CG/SG/IPS/Other)”. A new page will be populated wherein the deputation details may be captured accordingly.
Ans. First exceptional allowance rule “Deputation Allowance (5% or 10%) is required to be added through the option “Pay Bills→Rules of Employees→ Eligibility of exceptional Allowances/ Deductions for a specific employee”. Once, the rule is saved, the system will allow to save the deputation amount in the Due Part of Pay Allowances/Deduction Form.
Ans. The GPF Series for IAS/IFS/IRS can be created at DDO Checker level using option Establishment→Utility→PF Series for GPF (State/Others). Please see flow chart “GPF Details” in the section Flow Chart.
Ans. The GPF Series for State AG's/Other Offices can be created at DDO Checker level using option Establishment→Utility→PF Series for GPF (State/Others).Please see flow chart “GPF Details” in the section Flow Chart.
Ans. In case PF Agency not available for selection, request may be sent to email Id pfms-eis@gov.in therein mentioning the details of PF Agency/details for creation at EIS Admin Level in Central EIS.Please see flow chart “GPF Details” in the section Flow Chart.
Ans. Before capturing the End of service of employee DDO must check all the fields of master data of employee and same should be matched/verified from Service Book.If any mismatch same may be updated through Change module before capturing the End of service.
Note:No changes in Master Data will be allowed after End of service
Ans. Yes, DDO can revert the End of Service in EIS from Checker level under Revert Transactions. However, it must be noted that if Final payment has been initiated for an employee End of service can not be reverted.
Ans. This option is provided for capturing details of employees who have attained the superannuation/retirement. Also, this is used for entering details of End of Service for the employees whose service end due to VRS / Resignation/ Technical Resignation / Death etc.
Ans. The option of entering details of employee in case of Voluntary Retirement, Death, Technical Resignation is available at Establishment→Changes→End of Service. By default, in this option, the details of employee who have attained/crossed the age of superannuation are listed in the left pane.
In the left upper side, the link “All Employee” is given. By clicking on the link, the name of all the employees listed in the left pane. Select the name of desired employee from the list so populated, fill the details of End of Service due to VRS /Resignation / Death etc., and save the form.
Ans. Generally Government employee superannuated on last day of month after completion of age of 60 years but Judge/Member/Chairman retires from Govt. services on the date attaining 65/62 years of age i.e. one day before from his Date of Birth.
In above case, the change of Superannuation date option is provided at Maker level under Establishment→ Changes→ Change in employee details→ Change in Date of Superannuation (Without change in date of birth), select the name of employee from left pane, superannuation date will automatically appear(one day prior to Date of birth), now enter order number, date, remarks before saving. Changes will be effective only after verification from Checker level.
Note: This functionality is available for specific DDOs and for specific posts as mentioned above.
Ans. In this case an option 'End of Service(Exceptional cases)' provided in Checker level at Establishment→Utilities→ End of Service(Exception cases), select the name of employee from left pane, capture date of end of service and enter order number, date, remarks before saving. This change done not requires to verify from any level.
Ans. It should be noted that only those employees whose End of Service is done by "Termination (End Of Term Of Appointment)" will be available for reinstatement by following given steps:
- Select the option Establishment→Promotion/Transfer→Reinstatement of end of service and search the employee with any one of the parameter given in the form viz. Employee Code, Name or PAN.
- Enter Reinstatement and Order details and save the details.
- Verify the records at DDO Checker Level.
- Complete and Save the Initial Data Entry of Employee.
- Verify and Lock data by DDO Checker Level to complete the process of Reinstatement.
Ans. When the employee details are saved in the system for the first time in system, the following is generated as Employee PFMS Login ID in order of preference of availability:
- PAN Number (if available)
- Aadhaar Number (if PAN Number not available)
- Employee Code generated by system (if both PAN and Aadhaar Number not available)
Ans. There are many advantages of Employee PFMFS Login ID. If the user has access to PFMS-EIS portal, he/she can perform multiple task as well as can view various report as mentioned below:
- The user can view his entire details of Personal Information, Current Posting, Pay, PF/NPS, CGEGIS, CGHS, outstanding balances of Loans & Advances, Leaves, Bank, Government Accommodation etc.
- The user can view, print or download the Pay Slip for any month for which Salary Bills had been prepared through EIS.
- Can view consolidated statement of drawings during a financial year for Income Tax purposes and able to capture all type of tax savings.
- GPF employee will have following additional access:
- User can apply for GPF Advance, GPF Withdrawal and various other related forms.
- Can view, print and download reports related to Annual Statement, Ledger Card, Final Settlement, Interest Calculation System etc.
Ans. For the employee for whom DDO is processing monthly salary, the minimum requirement for generation of Employee PFMS Login ID is that details of both Mobile Number and Govt. Email ID have been saved in the System.
Ans. In case, if the official is not able to login in PFMS-EIS portal with PFMS Login ID, the DDO may check the following details:
- Whether details of both Mobile Number and Email ID(Gov or NIC mandatory) have been saved for this employee and are correct.
- If detail of Mobile Number or Email ID has been missing, the same may be captured through Establishment→Changes Menu.
- If (a) and (b) have been completed and still employee is not able to login in PFMS-EIS portal, the ITD section may be contacted through email (pfms-eis@gov.in) by providing Employee Code and DDO Code of the employee.
Ans. Yes, the Employee Code of 12 characters generated by system has relevance to following employee details. It will remain permanent during the entire government service.
a) Name of the Employee b) Controller Code (for Ministry/Department)
c) Gender d) Birth Year
- Example:
- For an employee Sh Manohar Kumar Prasad working in the Ministry of Finance having date of birth year as 1975, system will generate Employee Code as “MKP013M75001”:
- First three characters “MKS” indicates starting letter of First Name, Middle Name and Last Name respectively.
- Next three characters “013” is Controller Code of the Ministry of Govt. of India issued by O/o CGA (here the controller code for Ministry of Finance is 013)
- Next 1 character indicates gender of the employee (M for Male, F for Female)
- Next 2 characters represents the last two digits of birth year of employee
- Last 3 characters are running serial number staring from 001 (If the details of first 9 characters are same for two employees, the last three digits for second employee will be 002 and so on)
- The name of the employee has three part First Name (Compulsory), Middle Name and Last Name. In case Middle Name or/and Last Name is/are not applicable, the system place * for each missing name in the Employee Code in the first three characters. For e.g. If an employee name is Manohar only, then first three characters of the employee code will be M** and employee code will be M**013M75001.
Ans. Those deductions/recoveries that are not covered under Government Deductions and are not part of the PBR such as Association/Membership Fee, Credit & Thrift Society deduction, Court Attachment etc., are Non-Governmental Recoveries. These deductions can be made through Cheque or E-Payment (if Bank Details are available).
The DDO Maker can create NG Recover Types as per requirement. For every NG Recovery type in a particular DDO, each must have different Bank details for e-payment i.e. one Bank details cannot be saved for two or more different type of NG Recovery.
Ans. For saving NG Recovery Types in the system Go to link Pay Bill→Pay Bills→Non Govt.(NG) Recovery→Creation of NG Recovery Type. In the form so available, write the description for NG Recovery Type. If Bank details (for e-payment) are available, fill the details and save.
Ans. First the NG recovery type is/are saved in the system and Employees wise entry of NG Recovery amount are entered in the system using the option Pay Bill→Pay Bills→Non Govt.(NG) Recovery→Employee wise NG Entry.
When the Pay Bill generated for a month, for deducting NG Recovery, NG Recovery Processing is required to be done at the option Pay Bill→Pay Bills→Non Govt.(NG) Recovery→NG Recovery Processing.
Note:
- Non-Government Recovery details like the amount should not be modified once bill is processed and has been forwarded. If any changes are to be made, then the NG Recovery has to be reprocessed.
- Bank details corresponding to Non-Government Recoveries cannot be modified once a bill has been already processed and forwarded. If changes are to be made, then you have to wait until the bill cycle is complete i.e. after voucher generation.
Ans. When the NG Recovery Types are saved in the system with Bank details for e-payment, the system generated PFMS Unique ID for Bank details of NG Recovery types which may take maximum of 2 days depending on the bank details. If the Pay Bill is processed before the generation of concerned PFMS Unique ID of NG Recovery Bank details, the recovery will be booked in the PAO Suspense Accounts.
Ans. If the NPS EIS bills (main bill) are processed by selecting payment option as “E-payment”, the NPS Nil Bill will be automatically generated at DH level for receiving in PAO Office and DDO Maker level for passing in CDDO Office, when bill status changed to “Voucher entry done”. For the NPS EIS bills which are process through payment mode “Cheque”, the NPS Nil bill will not generate automatically and it is required to be passed manually by PAO/CDDO.
Ans. The DDO Name and it's details in EIS are fetched from PFMS Server. The users are not allowed to change any data. If any correction/modification is required, the DDO may sent written request for desired change to PAO Office. The PAO office will required to forward it to concerned Principal Accounts Office of the Ministry. On the request of Principal Accounts Office, the ITD Section, O/o the CGA will modify the desired details in PFMS. After necessary Updation in PFMS, the modified details will be automatically available in EIS portal.
Ans. The DDO will have to be first authorised for IGA. The authorisation can be done through DDO Checker Login.
- The DDO authorisation can be set using the option 'Authorisation for IGA' under Utilities in DDO Checker login.
- If authorisation has been set to 'Yes', while processing the salary bill, the DDO (Maker) will be asked whether the bill to be processed is 'Normal Bill' or under 'IGA'. The default is 'normal'. IF IGA is selected then he will have to select the controller code and the authorisation no from the drop down box provided. Then click on 'Process Bill'. Rest of the procedure is the same.
Ans. The Consolidated Statement is a projection of drawings of employee during a financial year to help DDO user to assess the Income Tax liabilities.
Ans. These types of bills pertains to previous financial year has to be deleted from Checker level at PayBill→Utilities.
Ans. Generate supplementary bill after editing basic pay upto 80% for those employe are on Child Care leave(CCL) more than one year and while forwarding to Checker edit HRA amount to 100% then forward bill to Checker.
Ans. if recovered portion amount has already been forwarded to NSDL then call-back that amount by correspondence with NSDL and adjust the amount into Govt. Account through Challan.
Ans. Deduction towards PM Cares Fund
- A centralized NG Recovery namely “PM Cares Fund�? has been created with bank details in EIS and is available to all DDOs.
- The deduction under this NG Recovery will be directly credited to the designated bank Account for PM cares Fund.
- A separate functionality has been provided for capturing the details of the Employee Contribution towards PM Cares Fund. (Process Flow described Below)
- Once, the data entry is completed, the processing of this NG Recovery will be done as per existing process i.e. NG Recovery processing will be done after Salary Bill processing by DDO Maker.
- Forwarding of bill by DDO Maker to DDO Checker will not be allowed, if the net amount for any employee, in the bill group, becomes negative or zero. The DDO Maker is required to correct the amount of NG Recovery of such employees and then again process the NG Recovery
- If the DDO is having other NG recoveries (Other than PM Cares Fund), the NG recovery processing option will process all NG recoveries for the DDO including PM Care Fund. No separate processing is required for PM Care fund, in such a case.
- The form is available in DDO Maker Login at Pay Bills→ Non Govt. (NG) Recoveries→ DELETE PM Cares Fund Entries
- Use this form for deleting employee wise deduction entries towards PM Cares Fund.
- There are two option for selection of employees. (i) Show Bill Group wise Employees and (ii) Show Employees Not Attached to any Bill Group
- Through either option when selected, list of employees will be shown. Select the check box against each employee by clicking “Select All�? button. Then click on “Save�? button. System will prompt message “Records deleted Successfully�?.
- Delete/Clear will be allowed ONLY if there is no pending bill with the NG recovery for PM Care ie. in status 'Forwarded To DDO /Locked / Uploaded to PFMS
- This option will be available only for those DDOs for whom the NG recovery was created through System. DDOs who created their own NG Recovery, will have to follow the usual process applicable to all other NG recoveries.
- Selection of Calculation Criteria for deduction in PM Cares Fund.
This form is available in DDO Maker at the following link Pay Bills→Non Govt. (NG) Recoveries→Calculation Criteria for PM Cares Fund Deduction One of the three options has to be selected :
- Basic Pay
- Basic Pay + DA
- Basic Pay + DA + NPA
- The DDO has to delete all the processed bill.
- The deletion of processed bill also deletes all the data entry of PF Cares Fund in the Form of PM Cares Fund (all data captured in Step 2).
- Data Entry for deduction towards PM Cares Fund.
The form is available in DDO Maker Login at Pay Bills→Non Govt. (NG) Recoveries→Entry for PM Cares Fund
Two options have been provided in the form.
- Bill group wise Employees
- Employees Not Attached to any Bill Group
- Under the Bill group wise Entry option, user has to select the "Bill Group" and "Enter the No. of Days for Calculation". After this, on click of Go, the system will auto calculate the amount for deduction for all employees as per the no of days entered. Select the check box for those employees from whom willingness has been received for deduction towards PF Cares Fund. Finally, user will be required to save the data. (Fig.1)
- When the option "Employees Not Attached to any Bill Group" is selected, User has to further select Office, Designation and the employees for the selected Office/Designation will be displayed. Enter the No. of Days. After this, on click of Go, the system will auto calculate the amount for deduction for selected employees as per the no of days entered. Select the check box for those employees from whom willingness has been received for deduction towards PF Cares Fund. Finally, user will be required to save the data. (Fig.1)
Please note that After auto-calculation of deduction towards PM Cares Fund, in both cases, the user has following facilities for modification in the "Amount to be Deducted" with respect to any employee/s, if required.
- The system will calculate the amount as per Criteria (Step 1) and No. of Days entered. DDO is advised to enter "No. of Days" as per majority of willingness of employees in the DDO.
- However, system will allow to re-calculate the amount individual wise on change of "No. of Days" for any employee through populated Data Entry Form, if required.
- In case, any employee is willing to contribute an amount which is not equal to calculated amount by system with input values, DDO can change the "Amount to be Deducted" as required. This will be shown in Yellow colour when form is again opened in Edit Mode after save.
- If after saving the data for a particular Bill group, DDO again opens the form and selects the same bill group, then all previously entered details will be shown as saved. If in Edit Mode, the no of days is entered different from the value previously entered, the new value of "No. of Days" will be effective only for any employee which has been attached to this bill group after saving of data for the first time or for whom option box was not selected previously. Any change to be done for an employee whose details have been previously saved, can be done by modifying the data for that particular employee.
- For further assistance, please go through the "Note" and "instructions" available within respective Form
Ans. Provision to capture the recovery of Special Festival Advance is available at Maker Level.
Process Flow – Pay Bill → Advances → Special Festival Package Advance Entry →Open New tab & Enter Sanction Order Number, Date, Select Office & Designation and Click on ‘Go’, then enter the recovery details and Save the same.
Schedule for Recovery of Special Festival Advance is also available along with Salary Bill
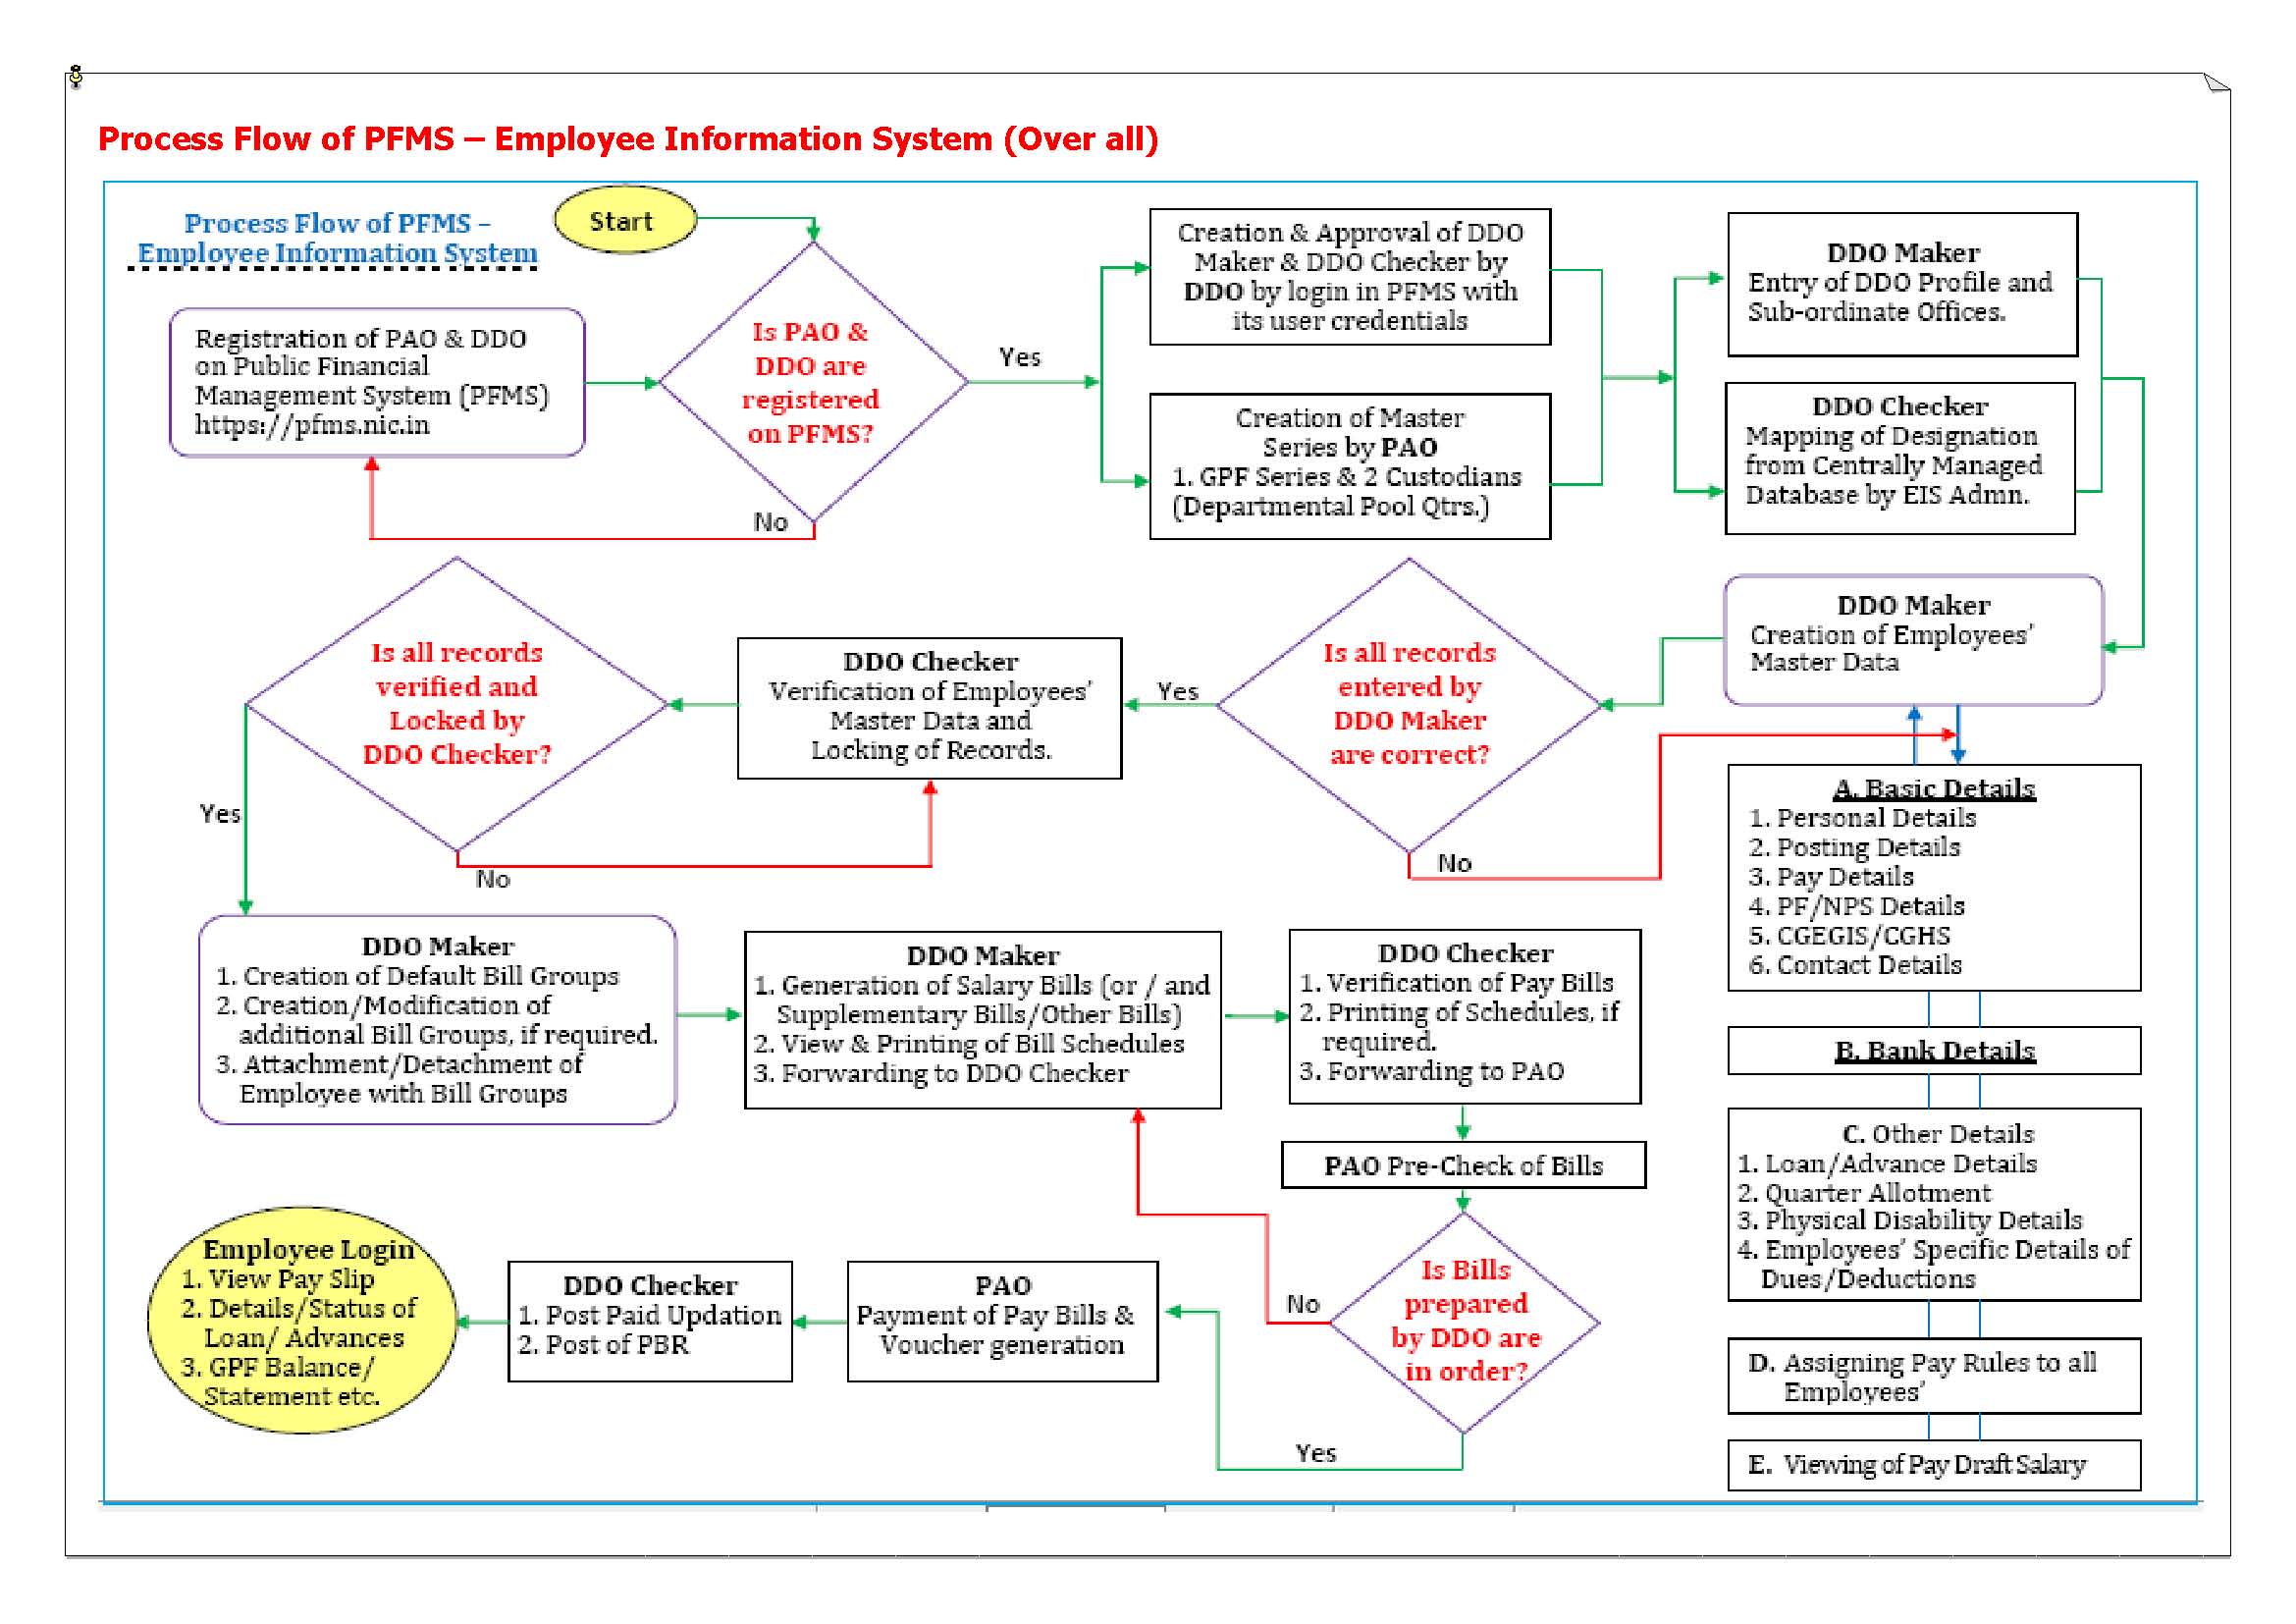
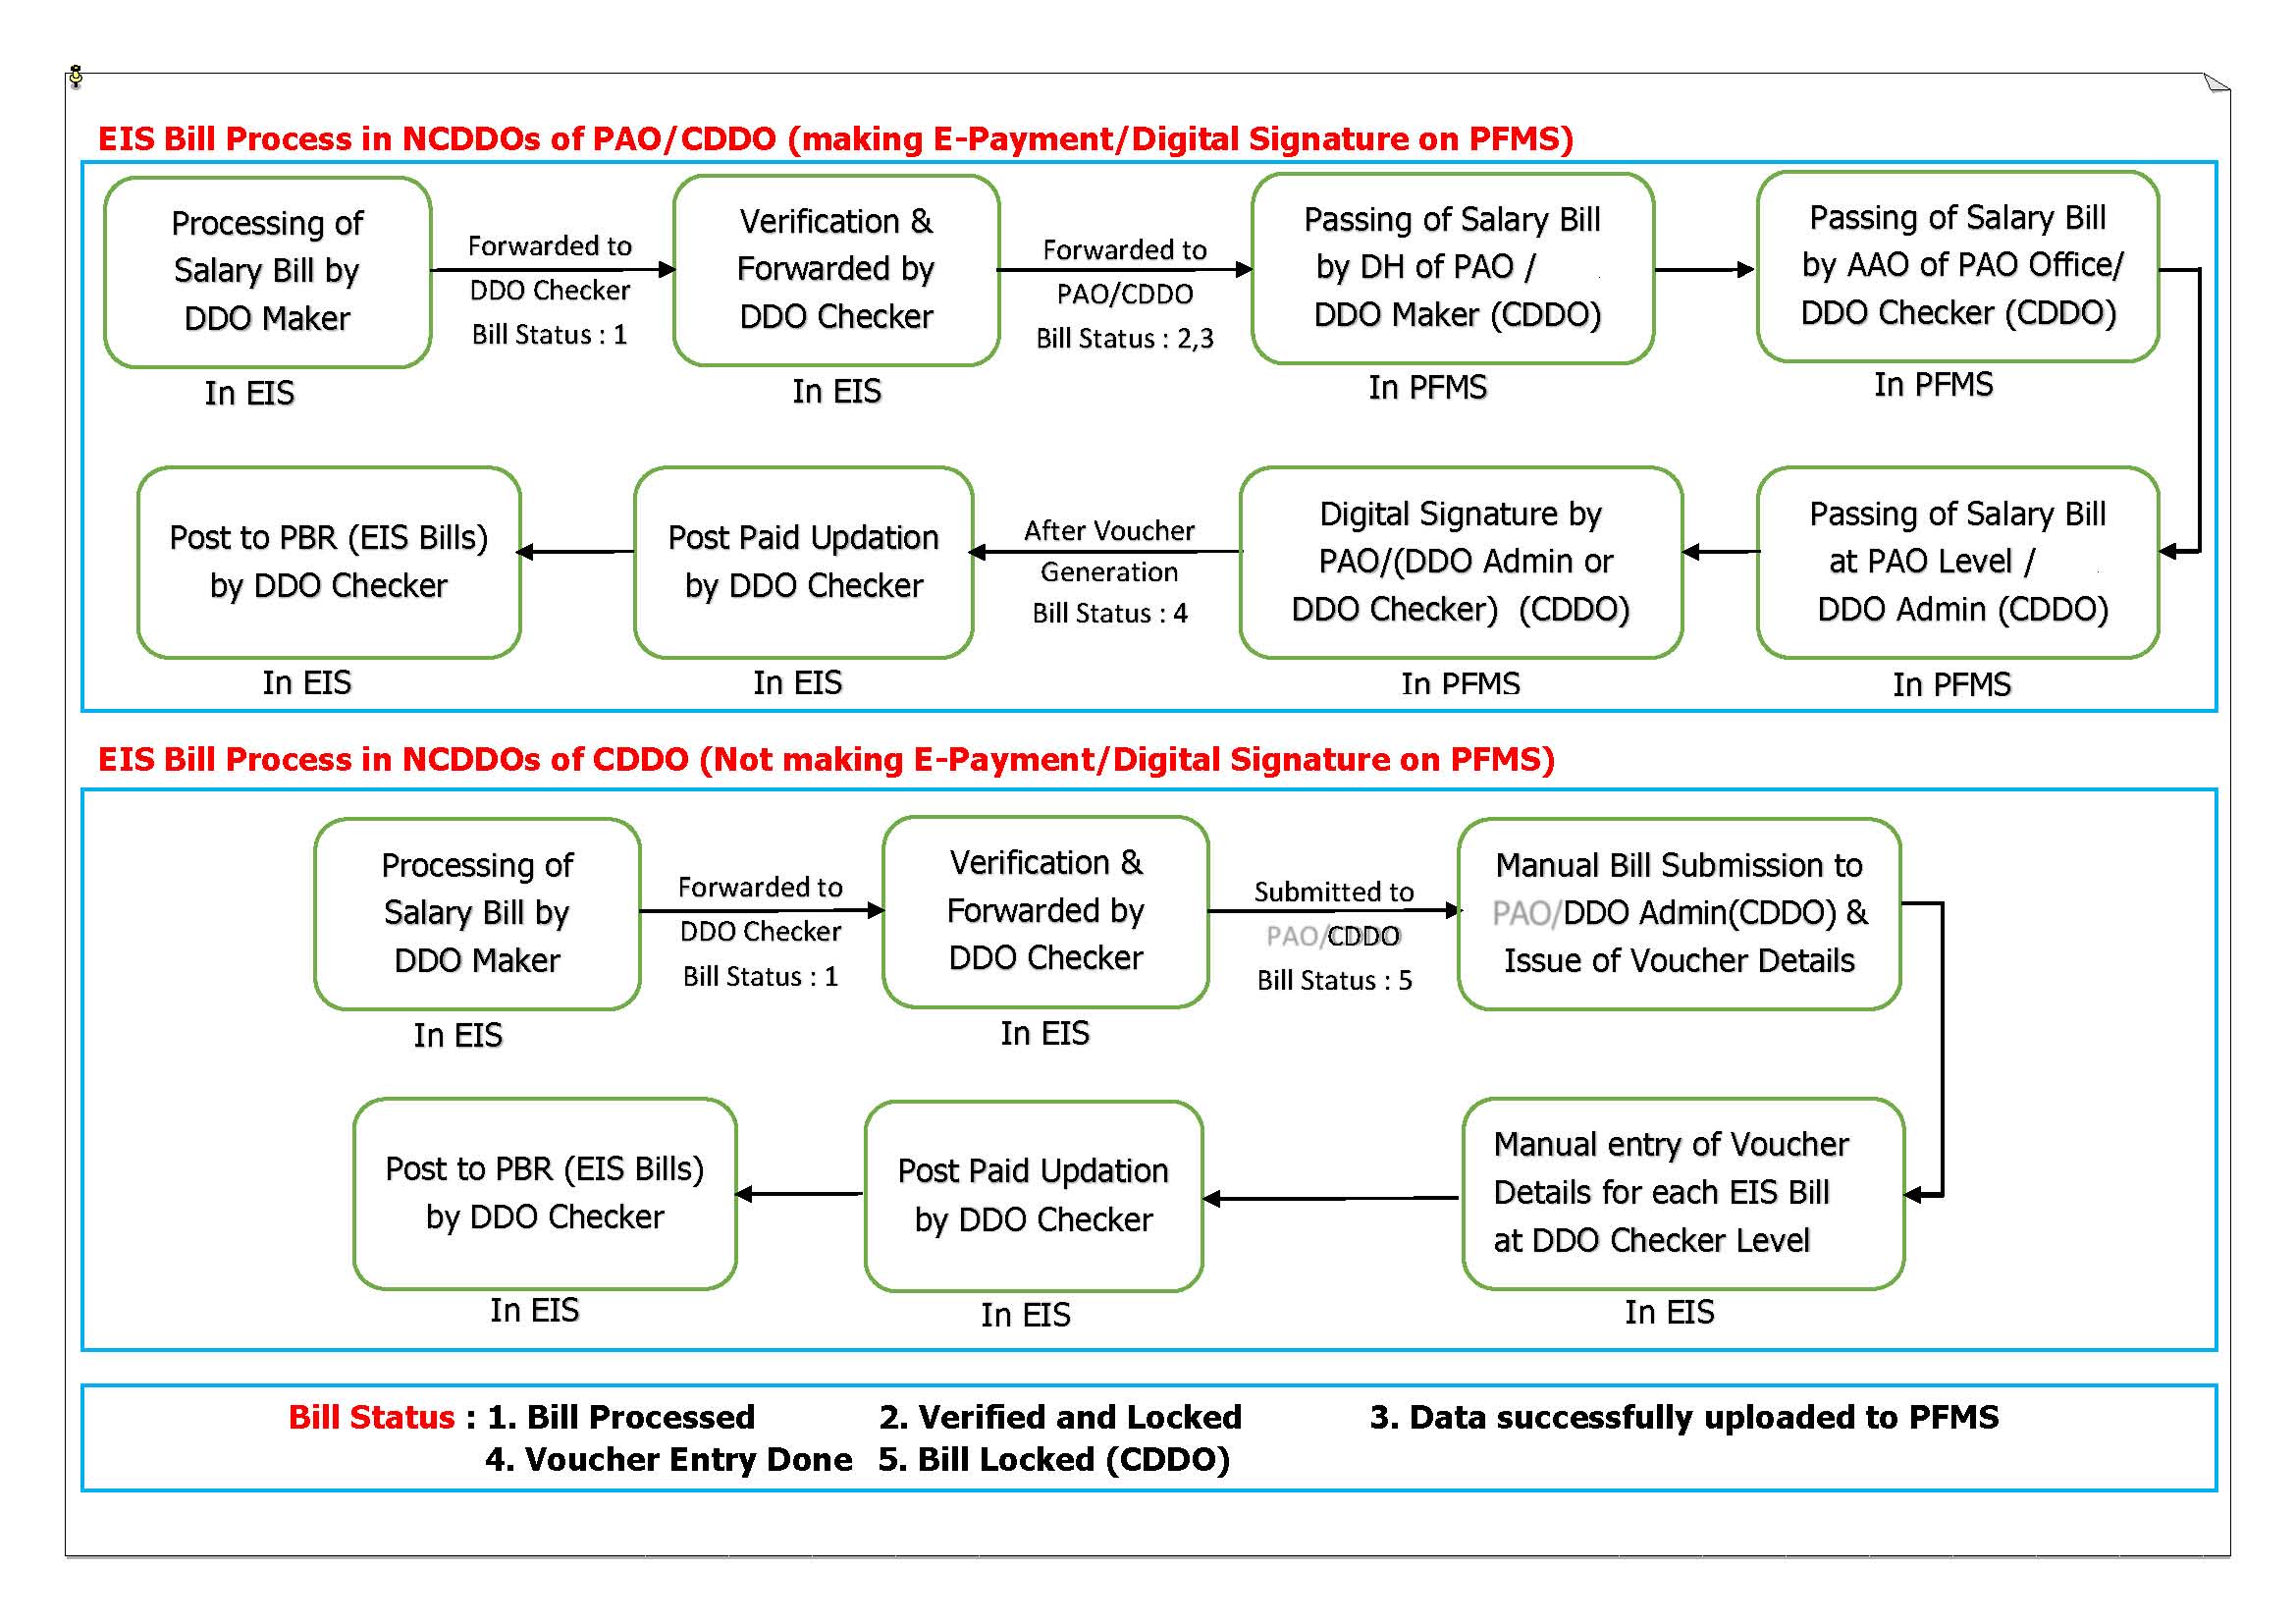
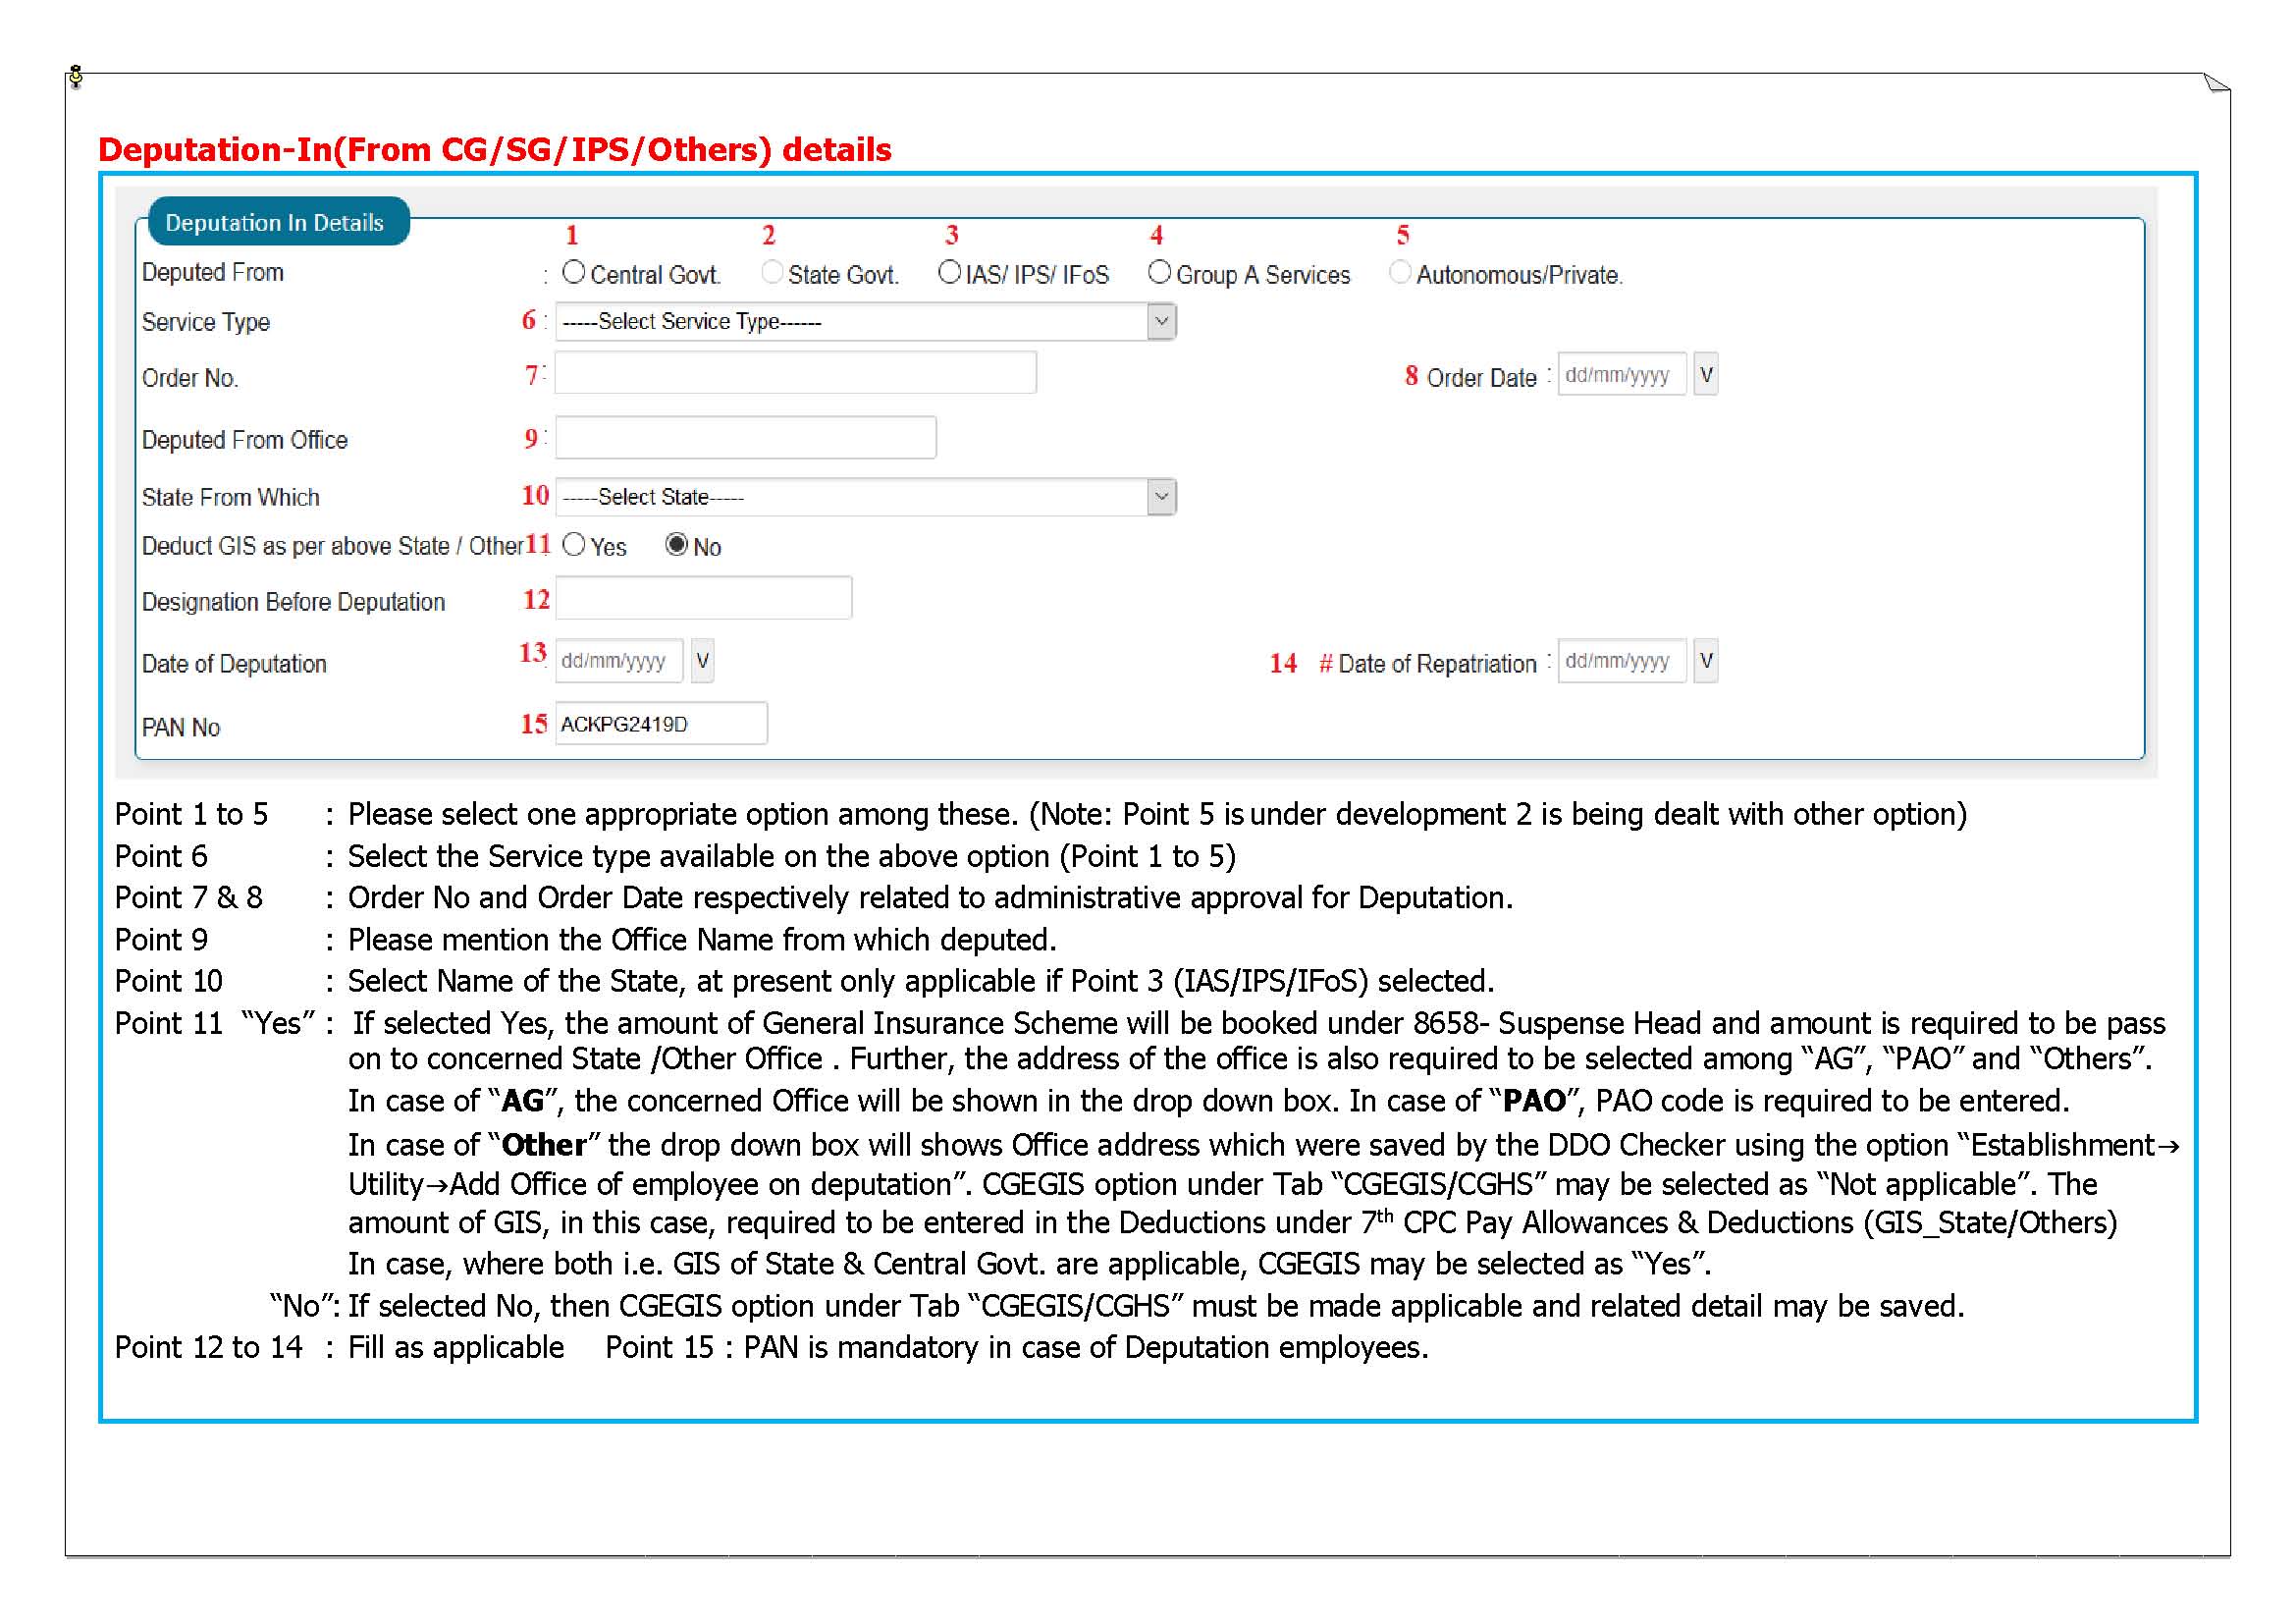
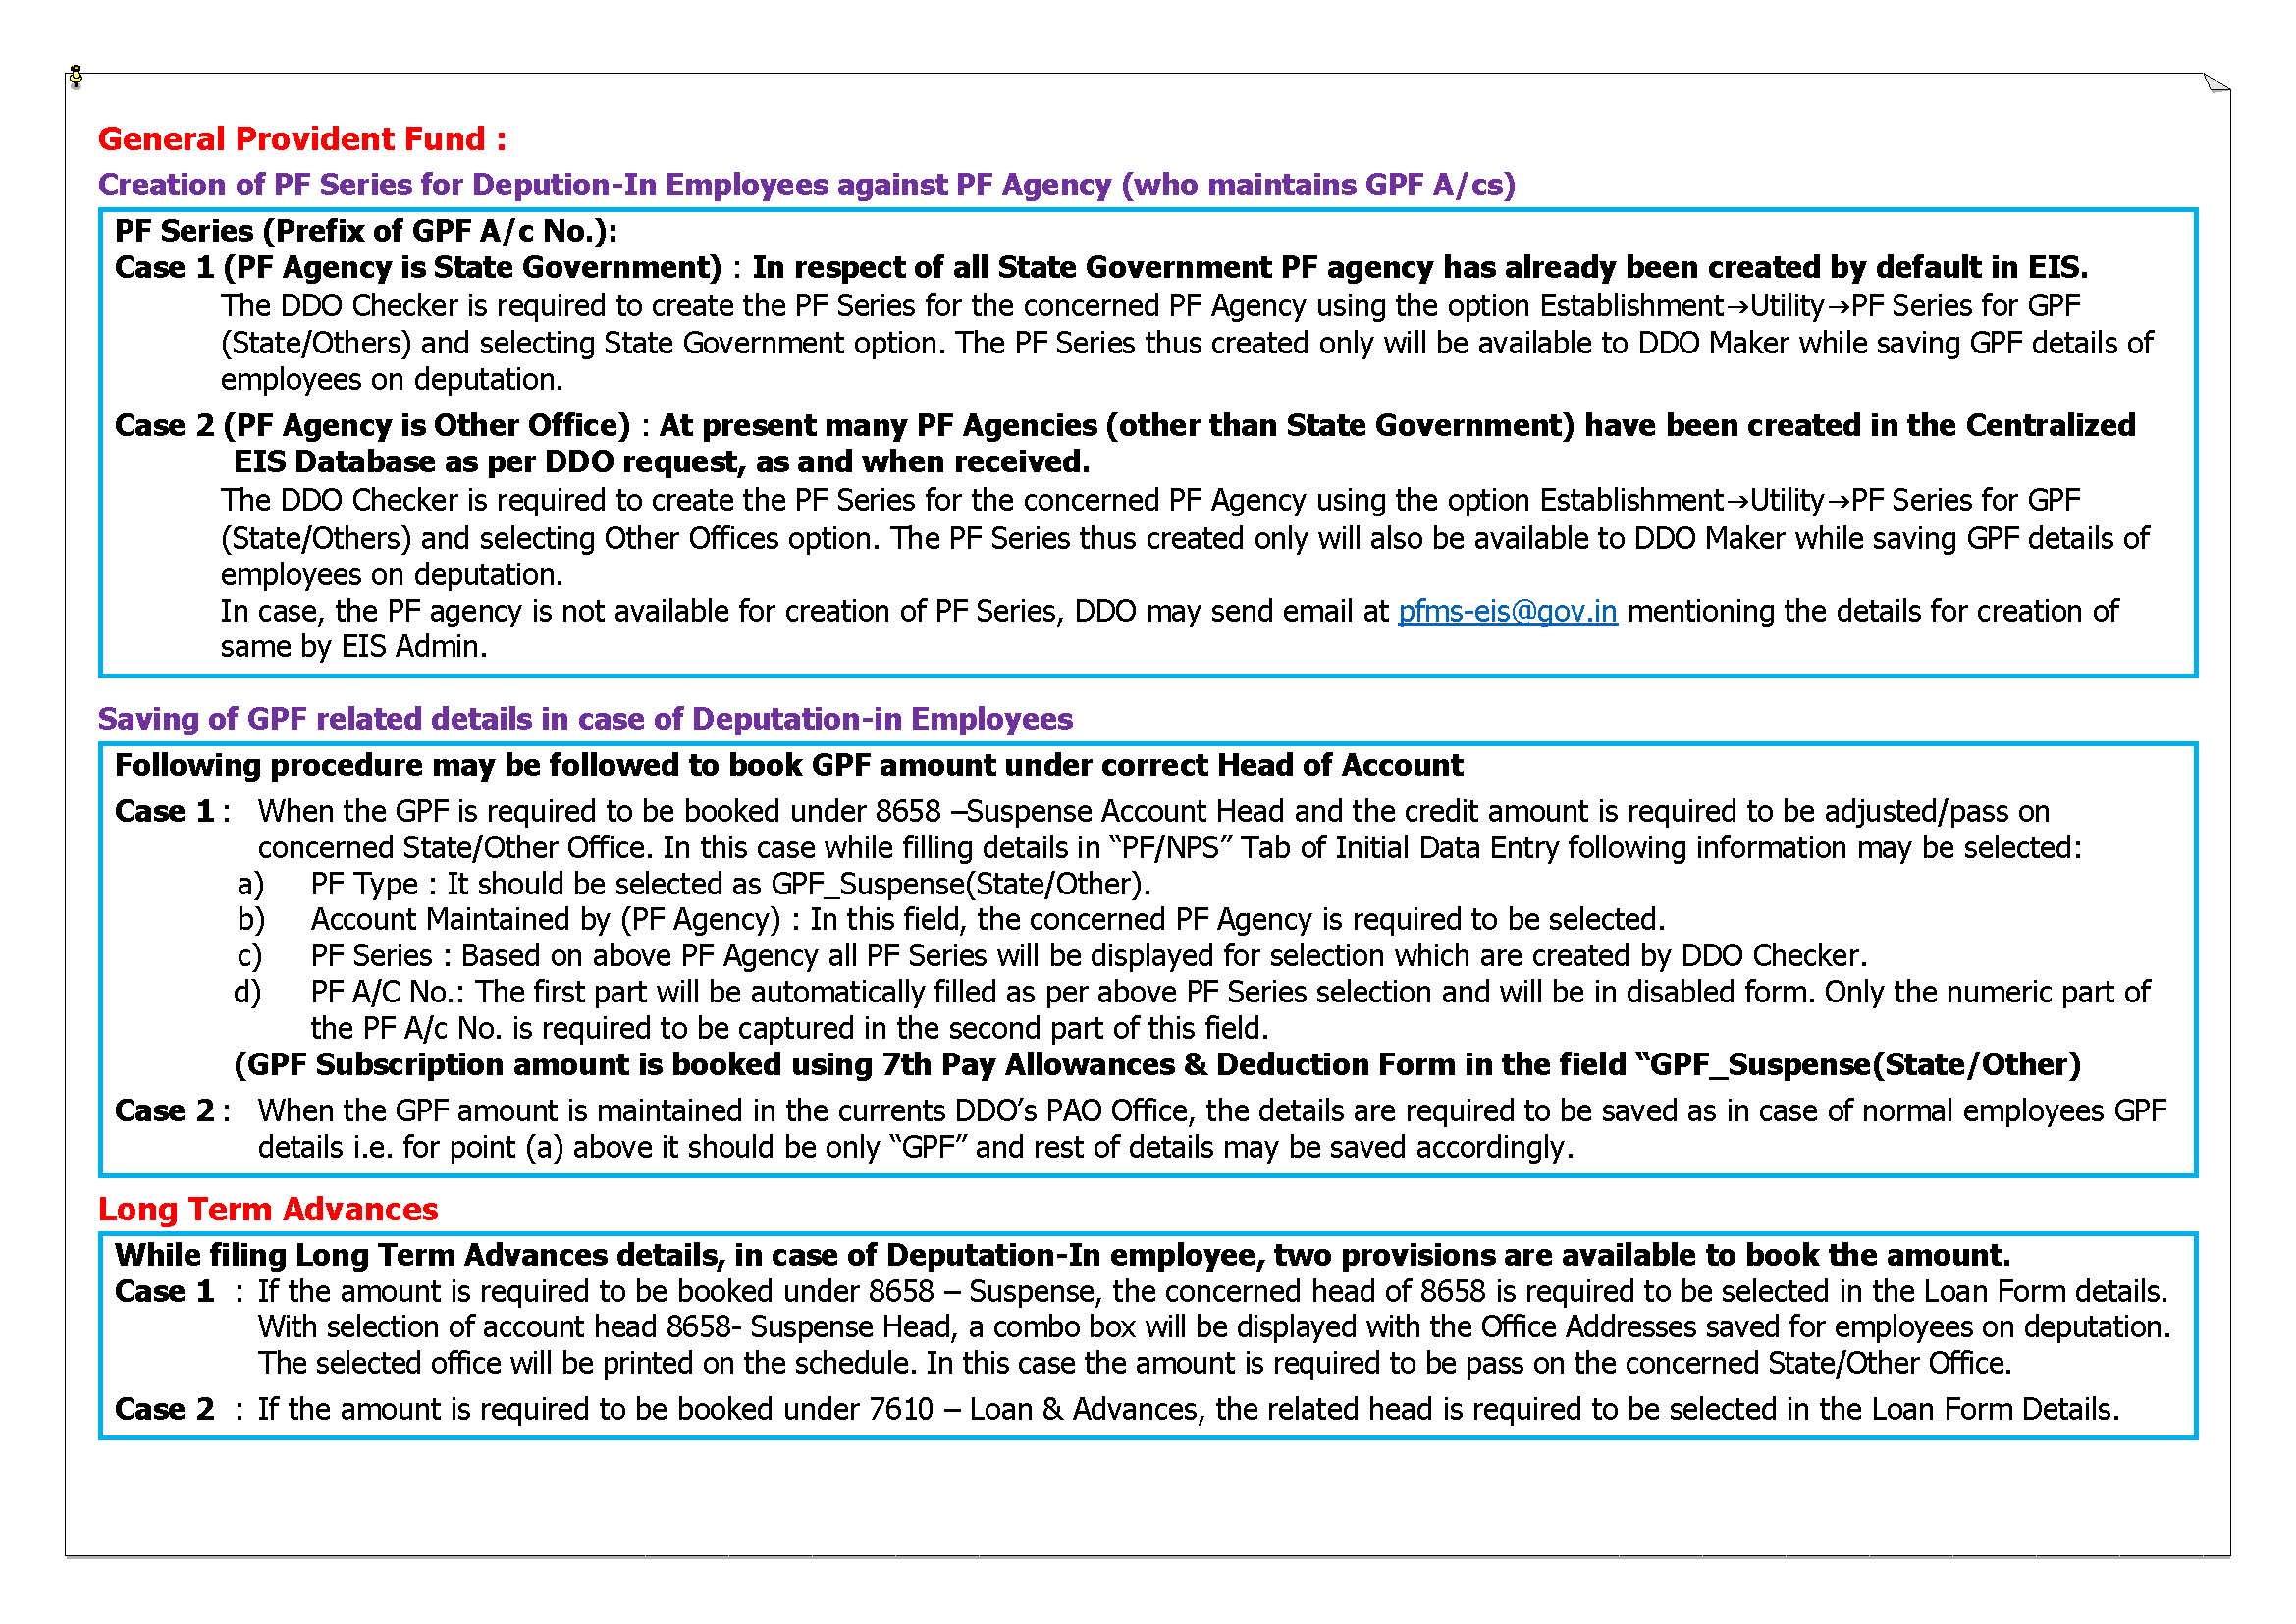
These FAQs are meant to provide general guidance to the users working on EIS Module of PFMS. The information provided in FAQs is subject to change and modifications at any time due to updation in the process flow or development. Though utmost care has been taken to provide accurate information (accurate at the time of uploading), users are requested to bring into notice about the error encounter, if any, so that the same can be rectified instantly. For further guidance, users may also contact EIS Team ITD(CGA) through email.